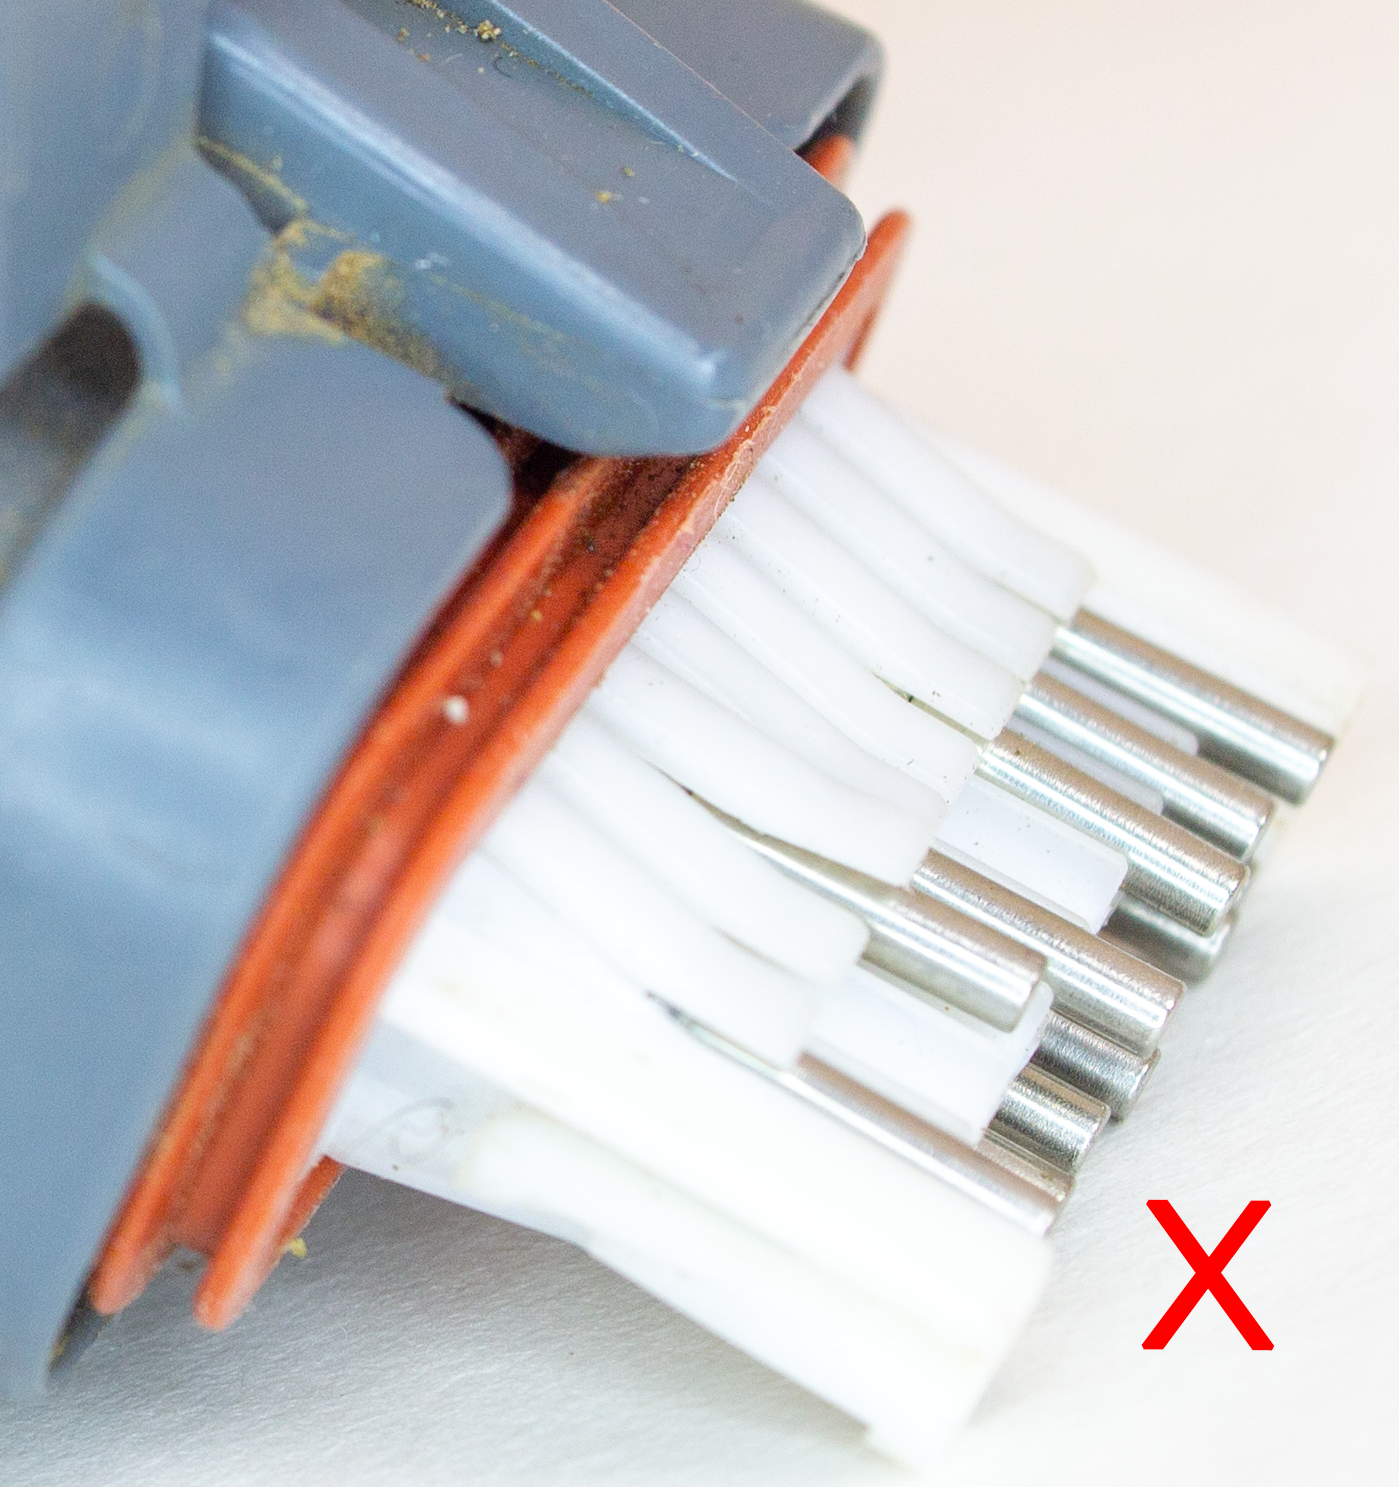
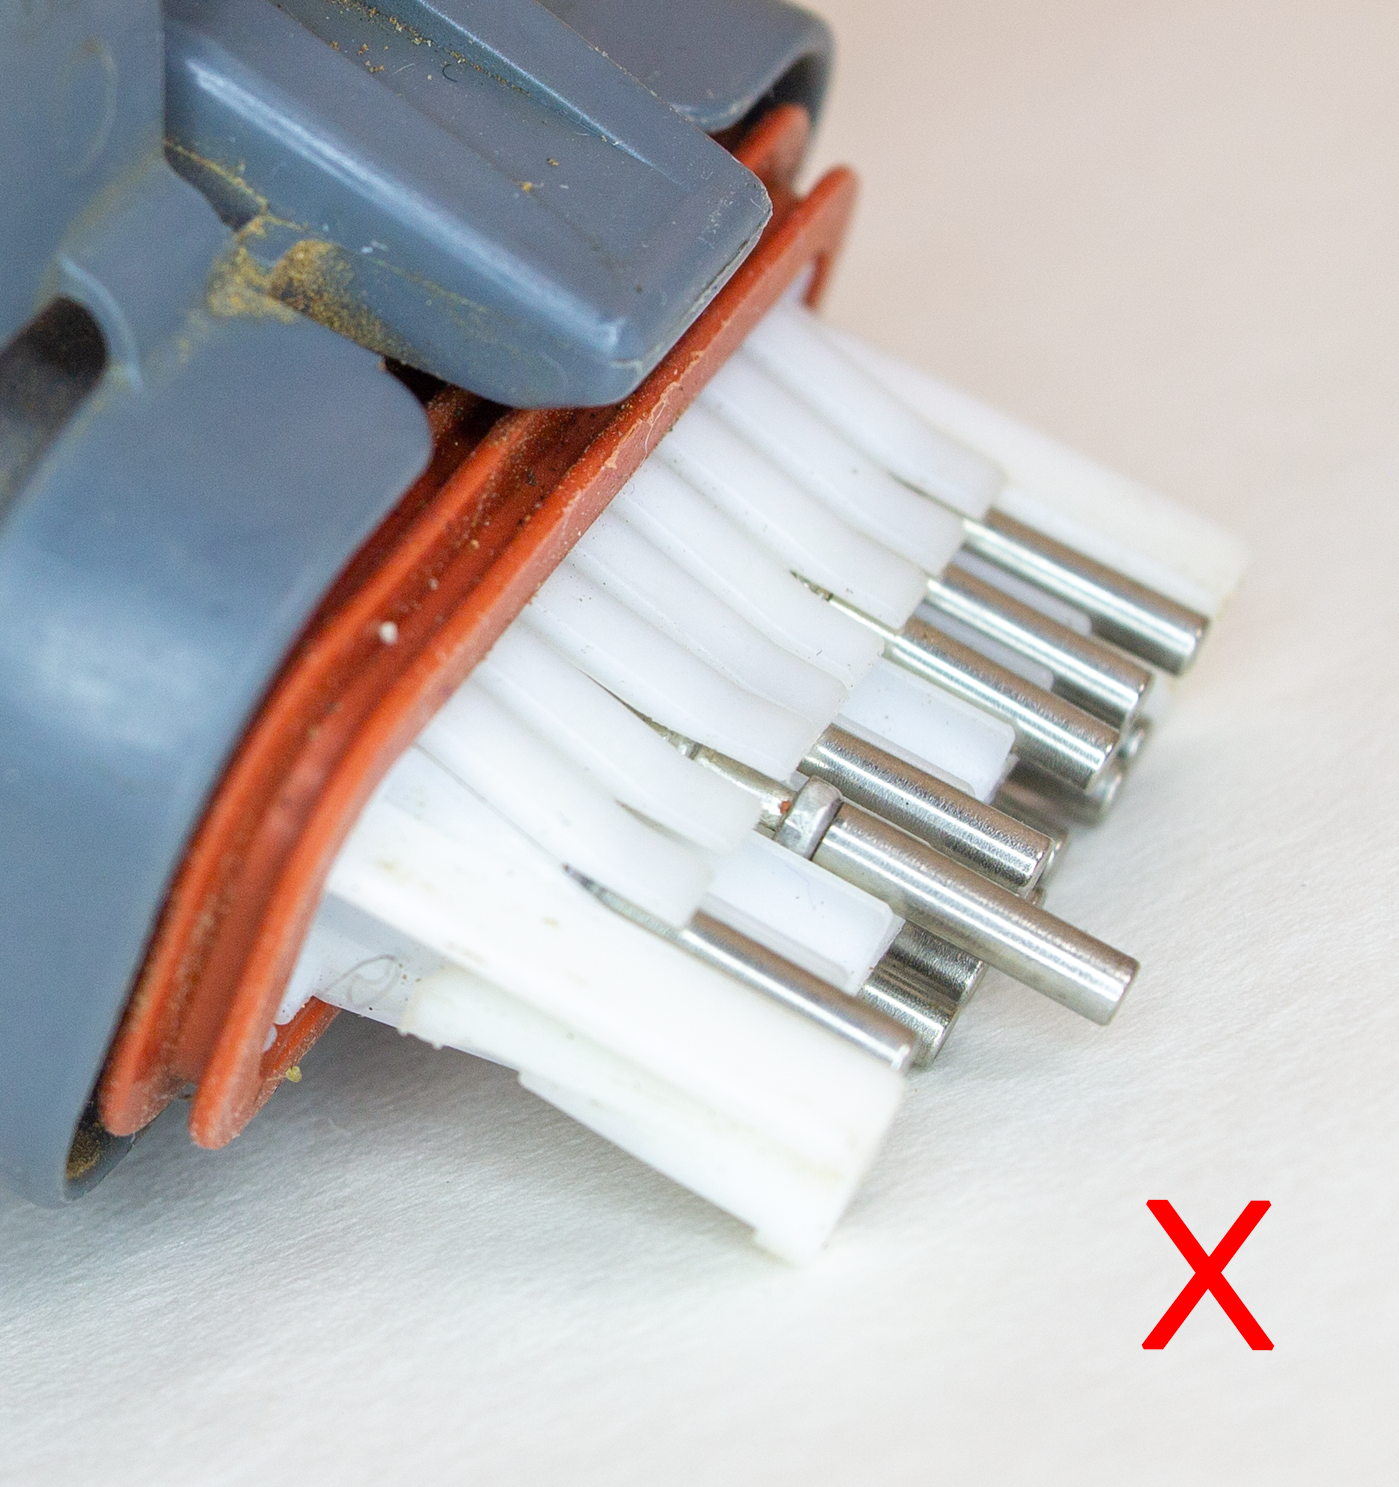
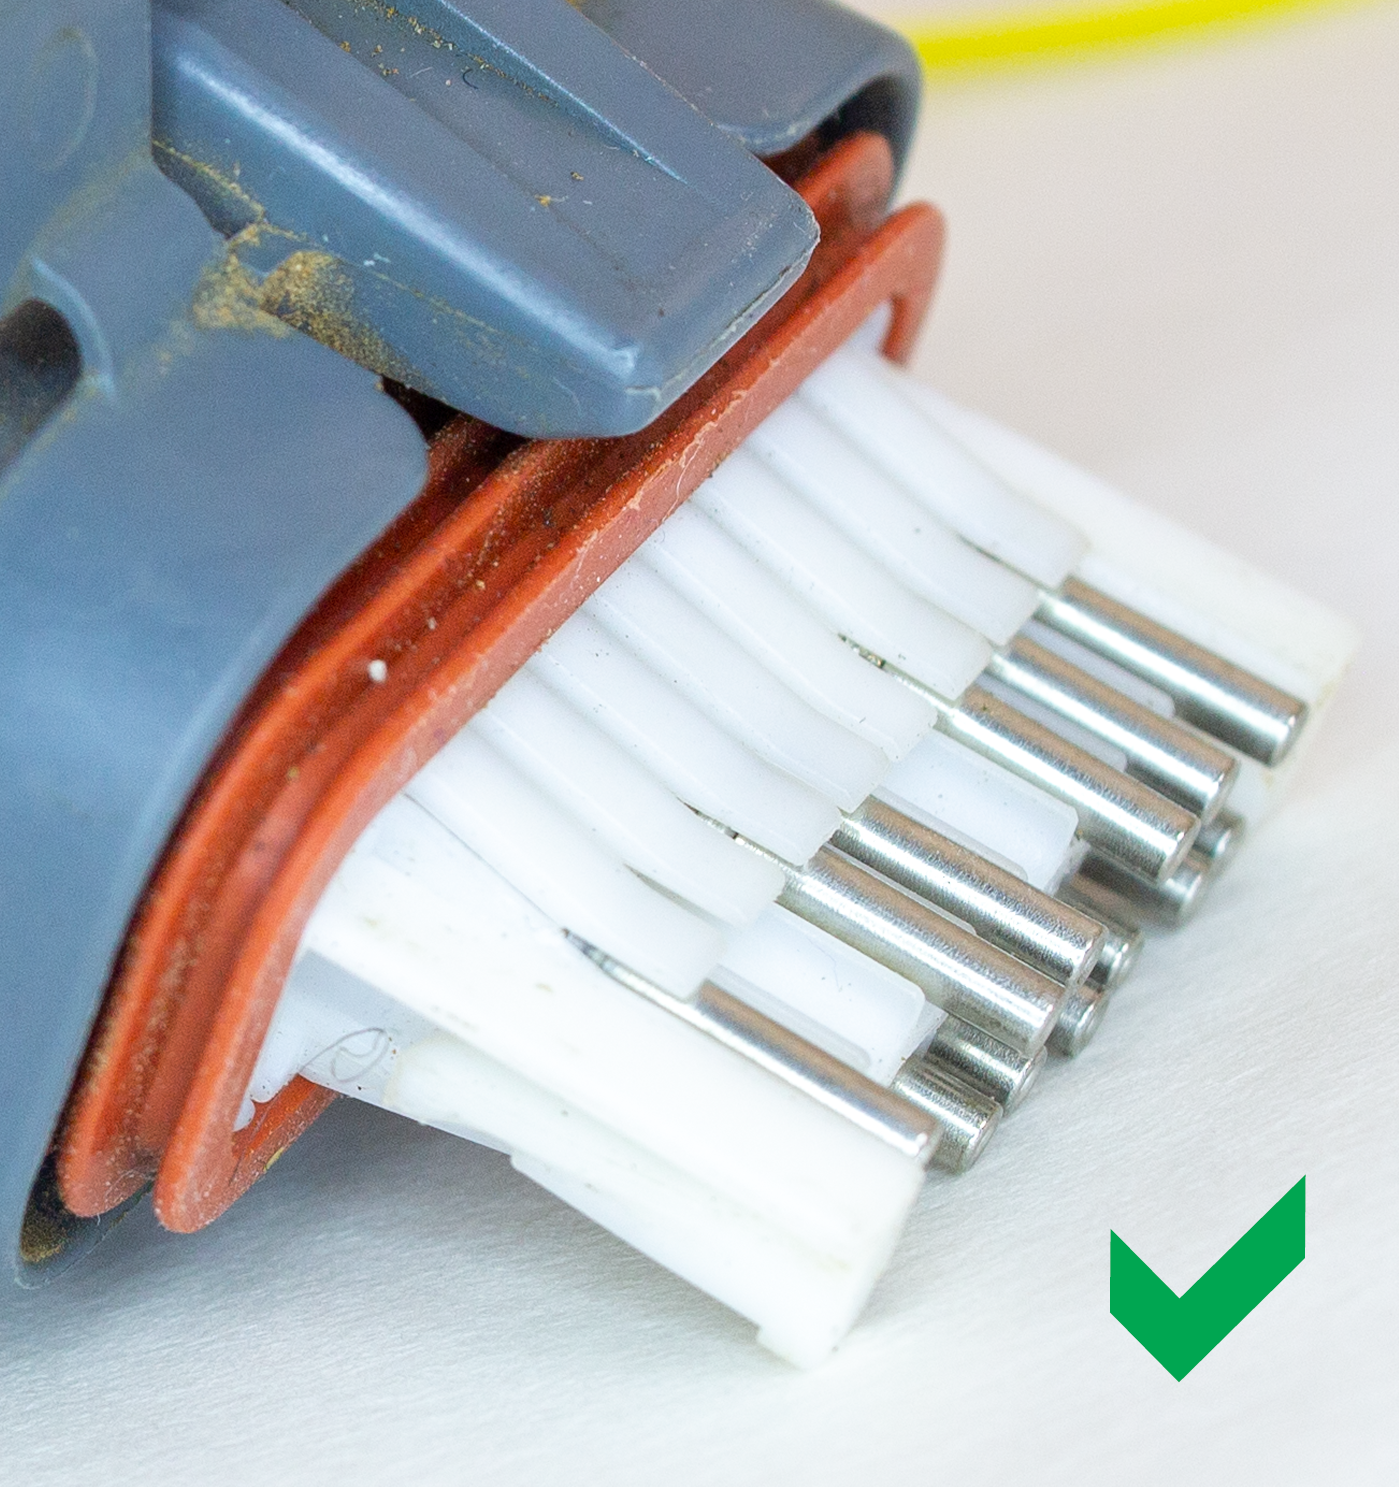
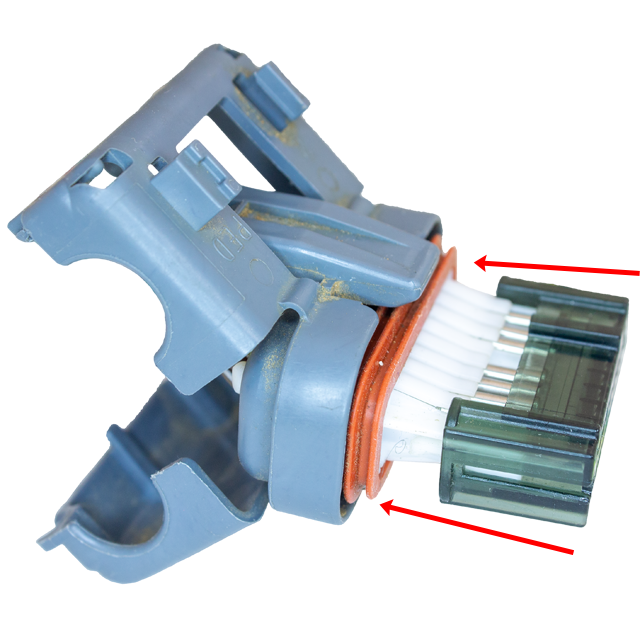
3240 - DC Switch Momentary (ON)-Off-(ON) Single Pole Double Throw Switch
9193 - Shipping upcharge - UPS OVERNIGHT
9992 - Shipping upcharge - UPS 2 DAY
59711 - MCS UTV Toggle switch turn signal kit with horn and hardware kit - Round LEDs
59713 - MCS Scooter ATV bike handlebar Button turn signal kit with install kit - Round LEDs
59732 - MCS 3/4" Recessed 12 Volt LED Marker Light - AMBER - 4pk
59734 - MCS 3/4" Recessed 12 Volt LED Marker Light - WHITE- 4pk
59756 - MCS UTV Lever switch turn signal kit with horn - Round LEDs
60200 - Amber/Amber LED marker light with bullet connectors
60201 - White LED: 12V Mini 3/4" Mount Amber LED Bullet Lamp Truck Trailer Side Marker
60203 - Flasher Relay: Adjustable 60-180min 3 Pin CF13 EP34 Car Flasher Relay Fix LED Light Hyper Blink
60431 - MCS UTV Toggle switch turn signal kit with horn and hardware kit - Rectangular LEDs
60436 - MCS UTV Toggle switch turn signal kit WITH horn - Rectangular LEDs
60437 - MCS UTV Lever switch turn signal kit with horn - Rectangular LEDs
60438 - MCS UTV Toggle switch turn signal kit - Rectangular LEDs
60439 - MCS UTV Lever switch turn signal kit - Rectangular LEDs
60440 - MCS Scooter ATV bike handlebar Button turn signal kit - Rectangular LEDs
60441 - Amber LED: 12V Surface mount rectangular marker light
60544 - Red LED: 12V Mini 3/4" Mount Amber LED Bullet Lamp Truck Trailer Side Marker
60557 - MCS UTV Heavy Duty Lever switch turn signal kit with horn and hardware - Oval LEDs
60773 - MCS UTV Toggle switch turn signal kit with horn and hardware - Oval LEDs License Plate LED
60833 - Red LED: 12V Oval marker light
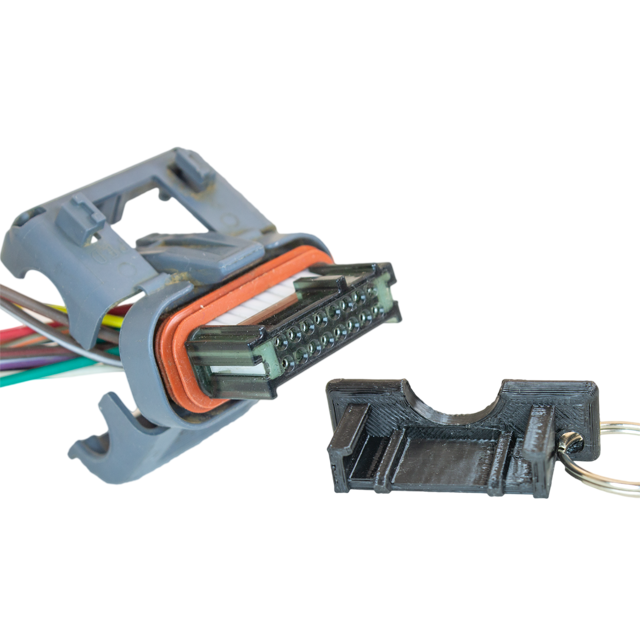
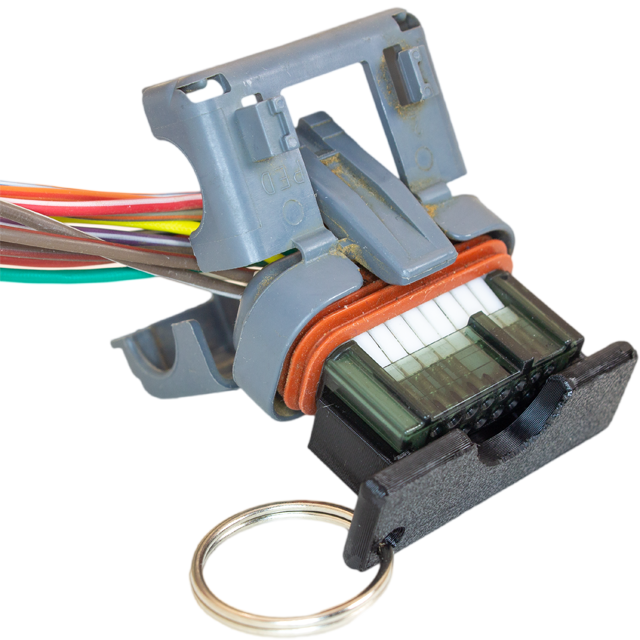
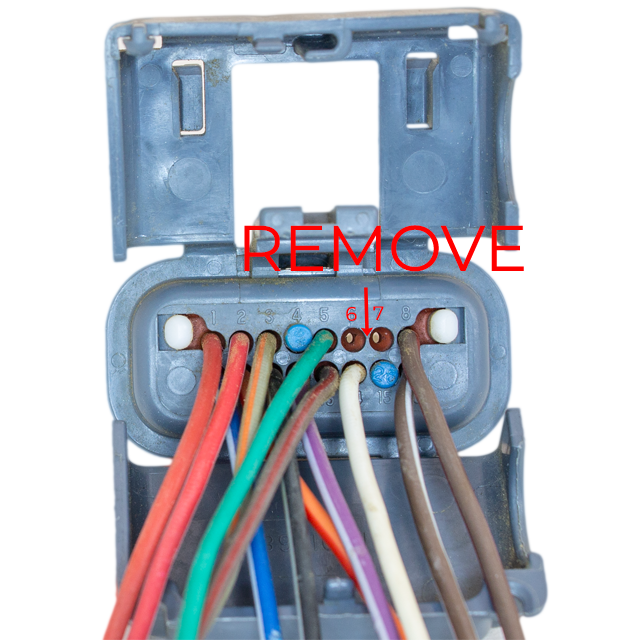
60897 - Extension for rear t harness (V1 plug and play turn signal kits)
61000 - MCS UTV vehicle safety switch turn signal kit with horn and hardware - 2 amber 2 red round LEDs and License Plate LED
61001 - MCS UTV vehicle safety switch turn signal kit with horn and hardware - 2 amber 2 red round LEDs and License Plate LED
61002 - MCS UTV vehicle safety switch turn signal kit with horn and hardware - 2 amber 2 red oval LEDs and License Plate LED
61003 - Red LED: 12V Mini 3/4" Mount Red LED Bullet Lamp Truck Trailer Side Marker
62319 - MCS UTV Toggle switch turn signal kit with hardware - 8 Oval LEDs
62333 - Universal horn kit with lighted button
62368 - 4 Round LED Light Pack: 2 Amber 2 Red
62370 - Basic Turn Signal Kit With Vertical Rocker Switch - 4A / 4R with key on blue backlight
62387 - Plug and play horn kit for Polaris RZR Ranger General with power plug
62393 - Turn Signal Rocker Switch - Blue backlight - Horizontal
62394 - Turn Signal Rocker Switch - Blue backlight - Vertical
62395 - Horn / Hazard switch
62420 - 12V automotive horn
62427 - UTV Horn Kit - with automotive horn
62640 - Rock Light Side Mirrors (set) with switch, harness
62649 - Turn Signal Main Control Module
62654 - Rock light mirror harness and switch kit
62715 - plug and play turn signal kit for 14+ RZR, 18+ Ranger: Rocker switch (blue), horn / hazard, 3/4 round lights (amber lens)
62719 - Horn / hazard add-on for plug and play turn kits - Blue Backlight
62723 - plug and play turn signal kit for Polaris General: Rocker switch (blue), horn / hazard, 3/4 round lights (amber lens)
62724 - Trailer Plug Addin (custom built T harness) - to be purchased with plug and play kit
62726 - plug and play turn signal kit for 14+ RZR, 18+ Ranger: Lever switch: (black), horn / hazard, 3/4 round lights (amber lens)
62727 - Plug and Play Turn Signal kit with Lever, hazard for Polaris General - amber/amber front lights
62728 - plug and play turn signal kit for Polaris General: Lever switch: (black), horn / hazard, 3/4 round lights (amber lens)
62733 - UTV Horn Kit - with automotive horn for 2019+ General / Ranger
62734 - Basic Turn Signal Kit With Vertical Rocker Switch (blue) - 4A / 4R
62735 - Basic Turn Signal Kit With Horizontal Rocker Switch - 4A / 4R
62736 - Replacement Part: (19) UTV Mirror Arm
62737 - Replacement Part: (1) Lens - Right
62752 - Replacement Part: (1) Lens - Left
62762 - Replacement Part: (27) Decorative film - BLACK (SET)
62763 - Replacement Part: (27) Decorative film - BLUE (SET)
62764 - Replacement Part: (27) Decorative film - RED (SET)
62765 - Replacement Part: (27) Decorative film - YELLOW (SET)
62770 - Replacement Part: (32) Front-metal tablet
62775 - Replacement Part: (16) Clamping screw
62777 - Rear T-Harness For Ranger / General Compatible with V1 Plug and Play Turn Signal Kits
62783 - Power harness pigtail with fuseholders for Polaris bus bar
62784 - Plug N Play REAR T: 15-18 RZR
62785 - Plug N Play REAR T: 2024+ 1000XP
62786 - Plug N Play REAR T: Ranger 570
62792 - plug and play turn signal kit for Polaris General: Lever switch: (black), hazard, 3/4 round lights (amber lens)
62793 - Rear T-Harness For RZR 19+
62798 - plug and play turn signal kit for 15-18 RZR: Rocker switch (blue), horn / hazard, 3/4 round lights (amber lens)
62800 - plug and play turn signal kit for 15-18 RZR: Lever switch: (black), hazard, 3/4 round lights (amber lens)
62801 - plug and play turn signal kit for 15-18 RZR: Lever switch: (black), horn / hazard, 3/4 round lights (amber lens)
62805 - plug and play turn signal kit for 13+ Ranger 500/570/900: Rocker switch (blue), horn / hazard, 3/4 round lights (amber lens)
62807 - plug and play turn signal kit for 13+ Ranger 500/570/900: Lever switch: (black), hazard, 3/4 round lights (amber lens)
62808 - plug and play turn signal kit for 13+ Ranger 500/570/900: Lever switch: (black), horn / hazard, 3/4 round lights (amber lens)
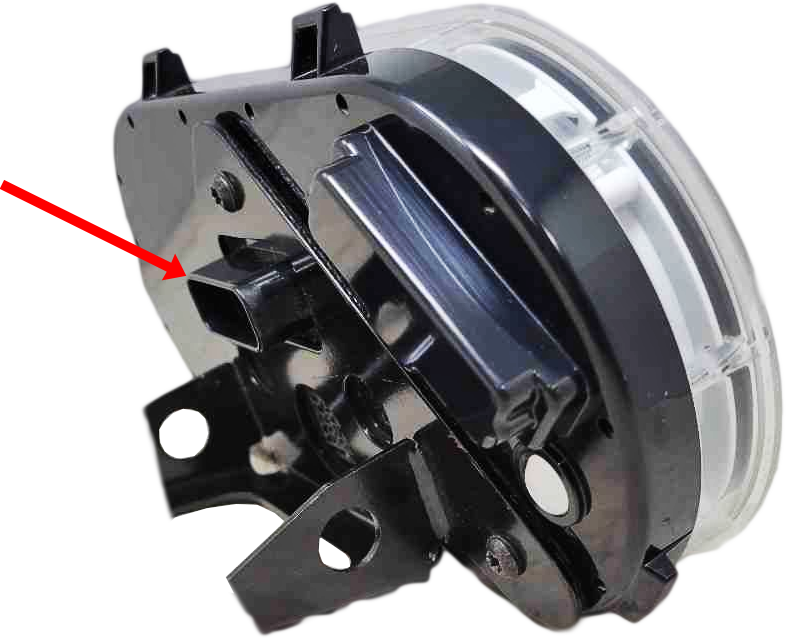
62809 - Turn Assembly with U bracket: 900
62810 - Turn Assembly with U bracket: 920 VERSION 1
62827 - LED Turn Indicator Kit for Plug and Play
62837 - Horizontal left/right rocker switch with harness and relay - blue backlight
62840 - Wire harness for rocker turn signal switch
62870 - plug and play turn signal kit for 14+ RZR, 18+ Ranger: Rocker switch (blue), 3/4 round lights (amber lens)
62871 - plug and play turn signal kit for 15-18 RZR: Rocker switch (blue), 3/4 round lights (amber lens)
62872 - plug and play turn signal kit for 13+ Ranger 500/570/900: Rocker switch (blue), 3/4 round lights (amber lens)
62873 - plug and play turn signal kit for Polaris General: Rocker switch (blue), 3/4 round lights (amber lens)
62874 - plug and play turn signal kit for 14+ RZR, 18+ Ranger: Rocker (horizontal) switch: 3/4 round lights (amber lens)
62875 - plug and play turn signal kit for 15-18 RZR: Rocker (horizontal) switch: 3/4 round lights (amber lens)
62876 - plug and play turn signal kit for 13+ Ranger 500/570/900: Rocker (horizontal) switch: 3/4 round lights (amber lens)
62877 - plug and play turn signal kit for Polaris General: Rocker (horizontal) switch: 3/4 round lights (amber lens)
62881 - Polaris dash cluster tie-in harness for Plug And Play Turn Signal Kits
62882 - Basic DIY Turn Kit (2 amber 2 red) - vertical rocker (blue backlight)
62884 - Basic DIY Turn Kit (4 amber 4 red) - vertical rocker
62886 - plug and play turn signal kit for 14+ RZR, 18+ Ranger: Lever switch: (black), hazard, 3/4 round lights (amber lens)
62887 - Turn Signal Rocker Switch - Green Backlight - Vertical
62888 - Turn Signal Rocker Switch - Orange Backlight - Vertical
62893 - plug and play turn signal kit for 14+ RZR, 18+ Ranger: Rocker switch (green), 3/4 round lights (amber lens)
62894 - plug and play turn signal kit for 15-18 RZR: Rocker switch (green), 3/4 round lights (amber lens)
62895 - plug and play turn signal kit for 13+ Ranger 500/570/900: Rocker switch (green), 3/4 round lights (amber lens)
62896 - plug and play turn signal kit for Polaris General: Rocker switch (green), 3/4 round lights (amber lens)
62897 - plug and play turn signal kit for 14+ RZR, 18+ Ranger: Rocker switch (amber), 3/4 round lights (amber lens)
62898 - plug and play turn signal kit for 15-18 RZR: Rocker switch (amber), 3/4 round lights (amber lens)
62899 - plug and play turn signal kit for 13+ Ranger 500/570/900: Rocker switch (amber), 3/4 round lights (amber lens)
62900 - plug and play turn signal kit for Polaris General: Rocker switch (amber), 3/4 round lights (amber lens)
62905 - plug and play turn signal kit for 14+ RZR, 18+ Ranger: 'L' Rocker switch: (blue), 3/4 round lights (amber lens)
62906 - Plug and play horn kit for 18+ Polaris Ranger
62908 - plug and play turn signal kit for 14+ RZR, 18+ Ranger: 'L' Rocker switch: (blue), hazard, 3/4 round lights (amber lens)
62910 - plug and play turn signal kit for 14+ RZR, 18+ Ranger: 'L' Rocker switch: (blue), horn / hazard, 3/4 round lights (amber lens)
62911 - Left/right turn rocker switch for Polaris Ranger
62915 - Single 4ft green horn wire
62943 - Fang Light Set with Clear Lens for 19+ RZR XP 1000, Turbo, Turbo S
62948 - plug and play turn signal kit for 14+ RZR, 18+ Ranger: Rocker switch (blue), replacement fang lights (clear lens)
62949 - plug and play turn signal kit for 14+ RZR, 18+ Ranger: Rocker switch (blue), horn / hazard, replacement fang lights (clear lens)
62950 - plug and play turn signal kit for 14+ RZR, 18+ Ranger: Rocker switch (green), replacement fang lights (clear lens)
62951 - plug and play turn signal kit for 14+ RZR, 18+ Ranger: Rocker switch (amber), replacement fang lights (clear lens)
62954 - L Series Horn / Hazard Rocker Switch
62957 - Plug and play horn and hazard kit for 19+ Polaris Ranger
62963 - Plug and Play turn kit with hazard (19+ RZR) Black Lever Switch -Fang Lights
62964 - plug and play turn signal kit for RZR Lever switch: (black), horn / hazard, replacement fang lights (clear lens)
62993 - Hazard add-on parts for universal rocker switch turn kits
63009 - Front LED Harness assy - lever - horn - fang lights
63012 - Horn / hazard add-on for plug and play turn kits - for Polaris Ranger - Blue Backlight
63032 - Clear/Amber LED marker light with bullet connectors
63033 - plug and play turn signal kit for 14+ RZR, 18+ Ranger: Rocker (horizontal) switch: 3/4 round lights (clear lens)
63034 - plug and play turn signal kit for 15-18 RZR: Rocker (horizontal) switch: 3/4 round lights (clear lens)
63035 - plug and play turn signal kit for 13+ Ranger 500/570/900: Rocker (horizontal) switch: 3/4 round lights (clear lens)
63036 - plug and play turn signal kit for Polaris General: Rocker (horizontal) switch: 3/4 round lights (clear lens)
63037 - plug and play turn signal kit for 14+ RZR, 18+ Ranger: Rocker switch (blue), 3/4 round lights (clear lens)
63038 - plug and play turn signal kit for 15-18 RZR: Rocker switch (blue), 3/4 round lights (clear lens)
63039 - plug and play turn signal kit for 13+ Ranger 500/570/900: Rocker switch (blue), 3/4 round lights (clear lens)
63040 - plug and play turn signal kit for Polaris General: Rocker switch (blue), 3/4 round lights (clear lens)
63041 - plug and play turn signal kit for 14+ RZR, 18+ Ranger: Rocker switch (green), 3/4 round lights (clear lens)
63042 - plug and play turn signal kit for 15-18 RZR: Rocker switch (green), 3/4 round lights (clear lens)
63043 - plug and play turn signal kit for 13+ Ranger 500/570/900: Rocker switch (green), 3/4 round lights (clear lens)
63044 - plug and play turn signal kit for Polaris General: Rocker switch (green), 3/4 round lights (clear lens)
63045 - plug and play turn signal kit for 14+ RZR, 18+ Ranger: Rocker switch (amber), 3/4 round lights (clear lens)
63046 - plug and play turn signal kit for 15-18 RZR: Rocker switch (amber), 3/4 round lights (clear lens)
63047 - plug and play turn signal kit for 13+ Ranger 500/570/900: Rocker switch (amber), 3/4 round lights (clear lens)
63048 - plug and play turn signal kit for Polaris General: Rocker switch (amber), 3/4 round lights (clear lens)
63049 - plug and play turn signal kit for 14+ RZR, 18+ Ranger: Rocker switch (blue), horn / hazard, 3/4 round lights (clear lens)
63051 - plug and play turn signal kit for 14+ RZR, 18+ Ranger: Lever switch: (black), hazard, 3/4 round lights (clear lens)
63052 - plug and play turn signal kit for 14+ RZR, 18+ Ranger: Lever switch: (black), horn / hazard, 3/4 round lights (clear lens)
63053 - plug and play turn signal kit for 15-18 RZR: Rocker switch (blue), horn / hazard, 3/4 round lights (clear lens)
63055 - plug and play turn signal kit for 15-18 RZR: Lever switch: (black), hazard, 3/4 round lights (clear lens)
63056 - plug and play turn signal kit for 15-18 RZR: Lever switch: (black), horn / hazard, 3/4 round lights (clear lens)
63057 - plug and play turn signal kit for 13+ Ranger 500/570/900: Rocker switch (blue), horn / hazard, 3/4 round lights (clear lens)
63059 - plug and play turn signal kit for 13+ Ranger 500/570/900: Lever switch: (black), hazard, 3/4 round lights (clear lens)
63060 - plug and play turn signal kit for 13+ Ranger 500/570/900: Lever switch: (black), horn / hazard, 3/4 round lights (clear lens)
63061 - plug and play turn signal kit for Polaris General: Rocker switch (blue), horn / hazard, 3/4 round lights (clear lens)
63063 - plug and play turn signal kit for Polaris General: Lever switch: (black), hazard, 3/4 round lights (clear lens)
63064 - plug and play turn signal kit for Polaris General: Lever switch: (black), horn / hazard, 3/4 round lights (clear lens)
63065 - plug and play turn signal kit for 14+ RZR, 18+ Ranger: 'L' Rocker switch: (blue), 3/4 round lights (clear lens)
63066 - plug and play turn signal kit for 14+ RZR, 18+ Ranger: 'L' Rocker switch: (blue), hazard, 3/4 round lights (clear lens)
63067 - plug and play turn signal kit for 14+ RZR, 18+ Ranger: 'L' Rocker switch: (blue), independent horn / hazard, 3/4 round lights (clear lens)
63068 - plug and play turn signal kit for 14+ RZR, 18+ Ranger: 'L' Rocker switch: (blue), horn / hazard, 3/4 round lights (clear lens)
63085 - plug and play turn signal kit for 14+ RZR, 18+ Ranger: Rocker (horizontal) switch: front: harness only
63086 - plug and play turn signal kit for 15-18 RZR: Rocker (horizontal) switch: front: harness only
63087 - plug and play turn signal kit for 13+ Ranger 500/570/900: Rocker (horizontal) switch: front: harness only
63088 - plug and play turn signal kit for Polaris General: Rocker (horizontal) switch: front: harness only
63089 - plug and play turn signal kit for 14+ RZR, 18+ Ranger: Rocker switch (blue), front: harness only
63090 - plug and play turn signal kit for 15-18 RZR: Rocker switch (blue), front: harness only
63091 - plug and play turn signal kit for 13+ Ranger 500/570/900: Rocker switch (blue), front: harness only
63092 - plug and play turn signal kit for Polaris General: Rocker switch (blue), front: harness only
63093 - plug and play turn signal kit for 14+ RZR, 18+ Ranger: Rocker switch (green), front: harness only
63094 - plug and play turn signal kit for 15-18 RZR: Rocker switch (green), front: harness only
63095 - plug and play turn signal kit for 13+ Ranger 500/570/900: Rocker switch (green), front: harness only
63096 - Green Vertical Rocker Turn Signal Kit for Polaris General - green backlight - no lights
63097 - plug and play turn signal kit for 14+ RZR, 18+ Ranger: Rocker switch (amber), front: harness only
63098 - plug and play turn signal kit for 15-18 RZR: Rocker switch (amber), front: harness only
63099 - plug and play turn signal kit for 13+ Ranger 500/570/900: Rocker switch (amber), front: harness only
63100 - plug and play turn signal kit for Polaris General: Rocker switch (amber), front: harness only
63101 - plug and play turn signal kit for 14+ RZR, 18+ Ranger: Rocker switch (blue), horn / hazard, front: harness only
63103 - plug and play turn signal kit for 14+ RZR, 18+ Ranger: Lever switch: (black), hazard, front: harness only
63104 - plug and play turn signal kit for 14+ RZR, 18+ Ranger: Lever switch: (black), horn / hazard, front: harness only
63105 - plug and play turn signal kit for 15-18 RZR: Rocker switch (blue), horn / hazard, front: harness only
63107 - plug and play turn signal kit for 15-18 RZR: Lever switch: (black), hazard, front: harness only
63108 - plug and play turn signal kit for 15-18 RZR: Lever switch: (black), horn / hazard, front: harness only
63109 - plug and play turn signal kit for 13+ Ranger 500/570/900: Rocker switch (blue), horn / hazard, front: harness only
63111 - plug and play turn signal kit for 13+ Ranger 500/570/900: Lever switch: (black), hazard, front: harness only
63112 - plug and play turn signal kit for 13+ Ranger 500/570/900: Lever switch: (black), horn / hazard, front: harness only
63113 - plug and play turn signal kit for Polaris General: Rocker switch (blue), horn / hazard, front: harness only
63115 - plug and play turn signal kit for Polaris General: Lever switch: (black), hazard, front: harness only
63116 - plug and play turn signal kit for Polaris General: Lever switch: (black), horn / hazard, front: harness only
63117 - plug and play turn signal kit for 14+ RZR, 18+ Ranger: 'L' Rocker switch: (blue), front: harness only
63118 - plug and play turn signal kit for 14+ RZR, 18+ Ranger: 'L' Rocker switch: (blue), hazard, front: harness only
63119 - plug and play turn signal kit for 14+ RZR, 18+ Ranger: 'L' Rocker switch: (blue), independent horn / hazard, front: harness only
63120 - plug and play turn signal kit for 14+ RZR, 18+ Ranger: 'L' Rocker switch: (blue), horn / hazard, front: harness only
63133 - plug and play turn signal kit for 14+ RZR, 18+ Ranger: Rocker (horizontal) switch: stick-on lights (clear lens) and 3/4 lights (clear lens)
63134 - plug and play turn signal kit for 14+ RZR, 18+ Ranger: Rocker (horizontal) switch: bolt on lights (6 led) (clear lens) and 3/4 lights (clear lens)
63135 - plug and play turn signal kit for 15-18 RZR: Rocker (horizontal) switch: stick-on lights (clear lens) and 3/4 lights (clear lens)
63136 - plug and play turn signal kit for 15-18 RZR: Rocker (horizontal) switch: bolt on lights (6 led) (clear lens) and 3/4 lights (clear lens)
63137 - plug and play turn signal kit for 13+ Ranger 500/570/900: Rocker (horizontal) switch: stick-on lights (clear lens)
63138 - plug and play turn signal kit for 13+ Ranger 500/570/900: Rocker (horizontal) switch: bolt on lights (6 led) (clear lens) and 3/4 lights (clear lens)
63139 - plug and play turn signal kit for Polaris General: Rocker (horizontal) switch: stick-on lights (clear lens) and 3/4 lights (clear lens)
63140 - plug and play turn signal kit for Polaris General: Rocker (horizontal) switch: bolt on lights (6 led) (clear lens) and 3/4 lights (clear lens)
63141 - plug and play turn signal kit for 14+ RZR, 18+ Ranger: Rocker switch (blue), stick-on lights (clear lens) and 3/4 lights (clear lens)
63142 - plug and play turn signal kit for 14+ RZR, 18+ Ranger: Rocker switch (blue), bolt on lights (6 led) (clear lens) and 3/4 lights (clear lens)
63143 - plug and play turn signal kit for 15-18 RZR: Rocker switch (blue), stick-on lights (clear lens) and 3/4 lights (clear lens)
63144 - plug and play turn signal kit for 15-18 RZR: Rocker switch (blue), bolt on lights (6 led) (clear lens) and 3/4 lights (clear lens)
63145 - plug and play turn signal kit for 13+ Ranger 500/570/900: Rocker switch (blue), stick-on lights (clear lens) and 3/4 lights (clear lens)
63146 - plug and play turn signal kit for 13+ Ranger 500/570/900: Rocker switch (blue), bolt on lights (6 led) (clear lens) and 3/4 lights (clear lens)
63147 - plug and play turn signal kit for Polaris General: Rocker switch (blue), stick-on lights (clear lens) and 3/4 lights (clear lens)
63148 - plug and play turn signal kit for Polaris General: Rocker switch (blue), bolt on lights (6 led) (clear lens) and 3/4 lights (clear lens)
63149 - plug and play turn signal kit for 14+ RZR, 18+ Ranger: Rocker switch (green), stick-on lights (clear lens) and 3/4 lights (clear lens)
63150 - plug and play turn signal kit for 14+ RZR, 18+ Ranger: Rocker switch (green), bolt on lights (6 led) (clear lens) and 3/4 lights (clear lens)
63151 - plug and play turn signal kit for 15-18 RZR: Rocker switch (green), stick-on lights (clear lens) and 3/4 lights (clear lens)
63152 - plug and play turn signal kit for 15-18 RZR: Rocker switch (green), bolt on lights (6 led) (clear lens) and 3/4 lights (clear lens)
63153 - plug and play turn signal kit for 13+ Ranger 500/570/900: Rocker switch (green), stick-on lights (clear lens) and 3/4 lights (clear lens)
63154 - plug and play turn signal kit for 13+ Ranger 500/570/900: Rocker switch (green), bolt on lights (6 led) (clear lens) and 3/4 lights (clear lens)
63155 - plug and play turn signal kit for Polaris General: Rocker switch (green), stick-on lights (clear lens) and 3/4 lights (clear lens)
63156 - plug and play turn signal kit for Polaris General: Rocker switch (green), bolt on lights (6 led) (clear lens) and 3/4 lights (clear lens)
63157 - plug and play turn signal kit for 14+ RZR, 18+ Ranger: Rocker switch (amber), stick-on lights (clear lens) and 3/4 lights (clear lens)
63158 - plug and play turn signal kit for 14+ RZR, 18+ Ranger: Rocker switch (amber), bolt on lights (6 led) (clear lens) and 3/4 lights (clear lens)
63159 - plug and play turn signal kit for 15-18 RZR: Rocker switch (amber), stick-on lights (clear lens) and 3/4 lights (clear lens)
63160 - plug and play turn signal kit for 15-18 RZR: Rocker switch (amber), bolt on lights (6 led) (white lens) and 3/4 lights (clear lens)
63161 - plug and play turn signal kit for 13+ Ranger 500/570/900: Rocker switch (amber), stick-on lights (clear lens) and 3/4 lights (clear lens)
63162 - plug and play turn signal kit for 13+ Ranger 500/570/900: Rocker switch (amber), bolt on lights (6 led) (clear lens) and 3/4 lights (clear lens)
63163 - plug and play turn signal kit for Polaris General: Rocker switch (amber), stick-on lights (clear lens) and 3/4 lights (clear lens)
63164 - plug and play turn signal kit for Polaris General: Rocker switch (amber), bolt on lights (6 led) (clear lens) and 3/4 lights (clear lens)
63165 - plug and play turn signal kit for 14+ RZR, 18+ Ranger: Rocker switch (blue), horn / hazard, stick-on lights (clear lens) and 3/4 lights (clear lens)
63166 - plug and play turn signal kit for 14+ RZR, 18+ Ranger: Rocker switch (blue), horn / hazard, bolt on lights (6 led) (clear lens) and 3/4 lights (clear lens)
63167 - plug and play turn signal kit for 14+ RZR, 18+ Ranger: Lever switch: (black), hazard, stick-on lights (clear lens) and 3/4 lights (clear lens)
63168 - plug and play turn signal kit for 14+ RZR, 18+ Ranger: Lever switch: (black), hazard, bolt on lights (6 led) (clear lens) and 3/4 lights (clear lens)
63169 - plug and play turn signal kit for 14+ RZR, 18+ Ranger: Lever switch: (black), horn / hazard, stick-on lights (clear lens) and 3/4 lights (clear lens)
63170 - plug and play turn signal kit for 14+ RZR, 18+ Ranger: Lever switch: (black), horn / hazard, bolt on lights (6 led) (clear lens) and 3/4 lights (clear lens)
63171 - plug and play turn signal kit for 15-18 RZR: Rocker switch (blue), horn / hazard, stick-on lights (clear lens) and 3/4 lights (clear lens)
63172 - plug and play turn signal kit for 15-18 RZR: Rocker switch (blue), horn / hazard, bolt on lights (6 led) (clear lens) and 3/4 lights (clear lens)
63175 - plug and play turn signal kit for 15-18 RZR: Lever switch: (black), hazard, stick-on lights (clear lens) and 3/4 lights (clear lens)
63176 - plug and play turn signal kit for 15-18 RZR: Lever switch: (black), hazard, bolt on lights (6 led) (white lens) and 3/4 lights (clear lens)
63177 - plug and play turn signal kit for 15-18 RZR: Lever switch: (black), horn / hazard, stick-on lights (clear lens) and 3/4 lights (clear lens)
63178 - plug and play turn signal kit for 15-18 RZR: Lever switch: (black), horn / hazard, bolt on lights (6 led) (clear lens) and 3/4 lights (clear lens)
63179 - plug and play turn signal kit for 13+ Ranger 500/570/900: Rocker switch (blue), horn / hazard, stick-on lights (clear lens) and 3/4 lights (clear lens)
63180 - plug and play turn signal kit for 13+ Ranger 500/570/900: Rocker switch (blue), horn / hazard, bolt on lights (6 led) (clear lens) and 3/4 lights (clear lens)
63183 - plug and play turn signal kit for 13+ Ranger 500/570/900: Lever switch: (black), hazard, stick-on lights (clear lens) and 3/4 lights (clear lens)
63184 - plug and play turn signal kit for 13+ Ranger 500/570/900: Lever switch: (black), hazard, bolt on lights (6 led) (clear lens) and 3/4 lights (clear lens)
63185 - plug and play turn signal kit for 13+ Ranger 500/570/900: Lever switch: (black), horn / hazard, stick-on lights (clear lens) and 3/4 lights (clear lens)
63188 - plug and play turn signal kit for Polaris General: Rocker switch (blue), horn / hazard, stick-on lights (clear lens) and 3/4 lights (clear lens)
63189 - plug and play turn signal kit for Polaris General: Rocker switch (blue), horn / hazard, bolt on lights (6 led) (clear lens) and 3/4 lights (clear lens)
63192 - plug and play turn signal kit for Polaris General: Lever switch: (black), hazard, stick-on lights (clear lens) and 3/4 lights (clear lens)
63193 - plug and play turn signal kit for Polaris General: Lever switch: (black), hazard, bolt on lights (6 led) (clear lens) and 3/4 lights (clear lens)
63194 - plug and play turn signal kit for Polaris General: Lever switch: (black), horn / hazard, stick-on lights (clear lens) and 3/4 lights (clear lens)
63195 - plug and play turn signal kit for Polaris General: Lever switch: (black), horn / hazard, bolt on lights (6 led) (clear lens) and 3/4 lights (clear lens)
63196 - plug and play turn signal kit for 14+ RZR, 18+ Ranger: 'L' Rocker switch: (blue), stick-on lights (clear lens) and 3/4 lights (clear lens)
63197 - plug and play turn signal kit for 14+ RZR, 18+ Ranger: 'L' Rocker switch: (blue), bolt on lights (6 led) (clear lens) and 3/4 lights (clear lens)
63198 - plug and play turn signal kit for 14+ RZR, 18+ Ranger: 'L' Rocker switch: (blue), hazard, stick-on lights (clear lens) and 3/4 lights (clear lens)
63199 - plug and play turn signal kit for 14+ RZR, 18+ Ranger: 'L' Rocker switch: (blue), hazard, bolt on lights (6 led) (clear lens) and 3/4 lights (clear lens)
63200 - plug and play turn signal kit for 14+ RZR, 18+ Ranger: 'L' Rocker switch: (blue), independent horn / hazard, stick-on lights (clear lens) and 3/4 lights (clear lens)
63201 - plug and play turn signal kit for 14+ RZR, 18+ Ranger: 'L' Rocker switch: (blue), horn / hazard, bolt on lights (6 led) (clear lens) and 3/4 lights (clear lens)
63202 - plug and play turn signal kit for 14+ RZR, 18+ Ranger: 'L' Rocker switch: (blue), horn / hazard, stick-on lights (clear lens) and 3/4 lights (clear lens)
63203 - plug and play turn signal kit for 14+ RZR, 18+ Ranger: 'L' Rocker switch: (blue), horn / hazard, bolt on lights (6 led) (clear lens) and 3/4 lights (clear lens)
63204 - plug and play turn signal kit for 13+ Ranger 500/570/900: Lever switch: (black), horn / hazard, bolt on lights (6 led) (clear lens) and 3/4 lights (clear lens)
63208 - Horn / Hazard switch - AMBER
63211 - Led Indicator Light (ONE LIGHT) Clear/Amber: bolt on
63212 - LED Strip Light for indicators with adhesive mounting
63213 - plug and play turn signal kit for 14+ RZR, 18+ Ranger: Rocker (horizontal) switch: sequential bar lights (white lens) and 3/4 lights (clear lens)
63214 - plug and play turn signal kit for 14+ RZR, 18+ Ranger: Rocker (horizontal) switch: bolt on lights (12 led) (clear lens) and 3/4 lights (clear lens)
63215 - plug and play turn signal kit for 15-18 RZR: Rocker (horizontal) switch: sequential bar lights (white lens) and 3/4 lights (clear lens)
63216 - plug and play turn signal kit for 15-18 RZR: Rocker (horizontal) switch: bolt on lights (12 led) (clear lens) and 3/4 lights (clear lens)
63217 - plug and play turn signal kit for 13+ Ranger 500/570/900: Rocker (horizontal) switch: sequential bar lights (white lens) and 3/4 lights (clear lens)
63218 - plug and play turn signal kit for 13+ Ranger 500/570/900: Rocker (horizontal) switch: bolt on lights (12 led) (clear lens) and 3/4 lights (clear lens)
63219 - plug and play turn signal kit for Polaris General: Rocker (horizontal) switch: sequential bar lights (white lens) and 3/4 lights (clear lens)
63220 - plug and play turn signal kit for Polaris General: Rocker (horizontal) switch: bolt on lights (12 led) (clear lens) and 3/4 lights (clear lens)
63221 - plug and play turn signal kit for 14+ RZR, 18+ Ranger: Rocker switch (blue), sequential bar lights (white lens) and 3/4 lights (clear lens)
63222 - plug and play turn signal kit for 14+ RZR, 18+ Ranger: Rocker switch (blue), bolt on lights (12 led) (clear lens) and 3/4 lights (clear lens)
63223 - plug and play turn signal kit for 15-18 RZR: Rocker switch (blue), sequential bar lights (white lens) and 3/4 lights (clear lens)
63224 - plug and play turn signal kit for 15-18 RZR: Rocker switch (blue), bolt on lights (12 led) (clear lens) and 3/4 lights (clear lens)
63225 - plug and play turn signal kit for 13+ Ranger 500/570/900: Rocker switch (blue), sequential bar lights (white lens) and 3/4 lights (clear lens)
63226 - plug and play turn signal kit for 13+ Ranger 500/570/900: Rocker switch (blue), bolt on lights (12 led) (clear lens) and 3/4 lights (clear lens)
63227 - plug and play turn signal kit for Polaris General: Rocker switch (blue), sequential bar lights (white lens) and 3/4 lights (clear lens)
63228 - plug and play turn signal kit for Polaris General: Rocker switch (blue), bolt on lights (12 led) (clear lens) and 3/4 lights (clear lens)
63229 - plug and play turn signal kit for 14+ RZR, 18+ Ranger: Rocker switch (green), sequential bar lights (white lens) and 3/4 lights (clear lens)
63230 - plug and play turn signal kit for 14+ RZR, 18+ Ranger: Rocker switch (green), bolt on lights (12 led) (clear lens) and 3/4 lights (clear lens)
63231 - plug and play turn signal kit for 15-18 RZR: Rocker switch (green), sequential bar lights (white lens) and 3/4 lights (clear lens)
63232 - plug and play turn signal kit for 15-18 RZR: Rocker switch (green), bolt on lights (12 led) (clear lens) and 3/4 lights (clear lens)
63233 - plug and play turn signal kit for 13+ Ranger 500/570/900: Rocker switch (green), sequential bar lights (white lens) and 3/4 lights (clear lens)
63234 - plug and play turn signal kit for 13+ Ranger 500/570/900: Rocker switch (green), bolt on lights (12 led) (clear lens) and 3/4 lights (clear lens)
63235 - plug and play turn signal kit for Polaris General: Rocker switch (green), sequential bar lights (white lens) and 3/4 lights (clear lens)
63236 - plug and play turn signal kit for Polaris General: Rocker switch (green), bolt on lights (12 led) (clear lens) and 3/4 lights (clear lens)
63237 - plug and play turn signal kit for 14+ RZR, 18+ Ranger: Rocker switch (amber), sequential bar lights (white lens) and 3/4 lights (clear lens)
63238 - plug and play turn signal kit for 14+ RZR, 18+ Ranger: Rocker switch (amber), bolt on lights (12 led) (clear lens) and 3/4 lights (clear lens)
63239 - plug and play turn signal kit for 15-18 RZR: Rocker switch (amber), sequential bar lights (white lens) and 3/4 lights (clear lens)
63240 - plug and play turn signal kit for 15-18 RZR: Rocker switch (amber), bolt on lights (12 led) (white lens) and 3/4 lights (clear lens)
63241 - plug and play turn signal kit for 13+ Ranger 500/570/900: Rocker switch (amber), sequential bar lights (white lens) and 3/4 lights (clear lens)
63242 - plug and play turn signal kit for 13+ Ranger 500/570/900: Rocker switch (amber), bolt on lights (12 led) (clear lens) and 3/4 lights (clear lens)
63243 - plug and play turn signal kit for Polaris General: Rocker switch (amber), sequential bar lights (clear lens) and 3/4 lights (clear lens)
63244 - plug and play turn signal kit for Polaris General: Rocker switch (amber), bolt on lights (12 led) (clear lens) and 3/4 lights (clear lens)
63245 - Plug and Play Turn Signal Kit with Vertical Horn/Hazard for 14+ RZR, 18+ Ranger xp - forward facing stick-on lights
63246 - plug and play turn signal kit for 14+ RZR, 18+ Ranger: Rocker switch (blue), horn / hazard, bolt on lights (12 led) (clear lens) and 3/4 lights (clear lens)
63247 - plug and play turn signal kit for 14+ RZR, 18+ Ranger: Lever switch: (black), hazard, sequential bar lights (white lens) and 3/4 lights (clear lens)
63248 - plug and play turn signal kit for 14+ RZR, 18+ Ranger: Lever switch: (black), hazard, bolt on lights (12 led) (clear lens) and 3/4 lights (clear lens)
63249 - plug and play turn signal kit for 14+ RZR, 18+ Ranger: Lever switch: (black), horn / hazard, sequential bar lights (white lens) and 3/4 lights (clear lens)
63250 - plug and play turn signal kit for 14+ RZR, 18+ Ranger: Lever switch: (black), horn / hazard, bolt on lights (12 led) (clear lens) and 3/4 lights (clear lens)
63251 - plug and play turn signal kit for 15-18 RZR: Rocker switch (blue), horn / hazard, sequential bar lights (white lens) and 3/4 lights (clear lens)
63252 - plug and play turn signal kit for 15-18 RZR: Rocker switch (blue), horn / hazard, bolt on lights (12 led) (clear lens) and 3/4 lights (clear lens)
63255 - plug and play turn signal kit for 15-18 RZR: Lever switch: (black), hazard, sequential bar lights (white lens) and 3/4 lights (clear lens)
63256 - plug and play turn signal kit for 15-18 RZR: Lever switch: (black), hazard, bolt on lights (12 led) (white lens) and 3/4 lights (clear lens)
63257 - plug and play turn signal kit for 15-18 RZR: Lever switch: (black), horn / hazard, sequential bar lights (white lens) and 3/4 lights (clear lens)
63258 - plug and play turn signal kit for 15-18 RZR: Lever switch: (black), horn / hazard, bolt on lights (12 led) (clear lens) and 3/4 lights (clear lens)
63259 - plug and play turn signal kit for 13+ Ranger 500/570/900: Rocker switch (blue), horn / hazard, sequential bar lights (white lens) and 3/4 lights (clear lens)
63260 - plug and play turn signal kit for 13+ Ranger 500/570/900: Rocker switch (blue), horn / hazard, bolt on lights (12 led) (clear lens) and 3/4 lights (clear lens)
63263 - plug and play turn signal kit for 13+ Ranger 500/570/900: Lever switch: (black), hazard, sequential bar lights (white lens) and 3/4 lights (clear lens)
63264 - plug and play turn signal kit for 13+ Ranger 500/570/900: Lever switch: (black), hazard, bolt on lights (12 led) (clear lens) and 3/4 lights (clear lens)
63265 - plug and play turn signal kit for 13+ Ranger 500/570/900: Lever switch: (black), horn / hazard, sequential bar lights (white lens) and 3/4 lights (clear lens)
63266 - plug and play turn signal kit for 13+ Ranger 500/570/900: Lever switch: (black), horn / hazard, bolt on lights (12 led) (clear lens) and 3/4 lights (clear lens)
63267 - plug and play turn signal kit for Polaris General: Rocker switch (blue), horn / hazard, sequential bar lights (white lens) and 3/4 lights (clear lens)
63268 - plug and play turn signal kit for Polaris General: Rocker switch (blue), horn / hazard, bolt on lights (12 led) (clear lens) and 3/4 lights (clear lens)
63271 - plug and play turn signal kit for Polaris General: Lever switch: (black), hazard, sequential bar lights (white lens) and 3/4 lights (clear lens)
63272 - plug and play turn signal kit for Polaris General: Lever switch: (black), hazard, bolt on lights (12 led) (clear lens) and 3/4 lights (clear lens)
63273 - plug and play turn signal kit for Polaris General: Lever switch: (black), horn / hazard, sequential bar lights (white lens) and 3/4 lights (clear lens)
63274 - plug and play turn signal kit for Polaris General: Lever switch: (black), horn / hazard, bolt on lights (12 led) (clear lens) and 3/4 lights (clear lens)
63275 - plug and play turn signal kit for 14+ RZR, 18+ Ranger: 'L' Rocker switch: (blue), sequential bar lights (white lens) and 3/4 lights (clear lens)
63276 - plug and play turn signal kit for 14+ RZR, 18+ Ranger: 'L' Rocker switch: (blue), bolt on lights (12 led) (clear lens) and 3/4 lights (clear lens)
63277 - plug and play turn signal kit for 14+ RZR, 18+ Ranger: 'L' Rocker switch: (blue), hazard, sequential bar lights (white lens) and 3/4 lights (clear lens)
63278 - plug and play turn signal kit for 14+ RZR, 18+ Ranger: 'L' Rocker switch: (blue), hazard, bolt on lights (12 led) (clear lens) and 3/4 lights (clear lens)
63279 - plug and play turn signal kit for 14+ RZR, 18+ Ranger: 'L' Rocker switch: (blue), independent horn / hazard, sequential bar lights (white lens) and 3/4 lights (clear lens)
63280 - plug and play turn signal kit for 14+ RZR, 18+ Ranger: 'L' Rocker switch: (blue), horn / hazard, bolt on lights (12 led) (clear lens) and 3/4 lights (clear lens)
63281 - plug and play turn signal kit for 14+ RZR, 18+ Ranger: 'L' Rocker switch: (blue), horn / hazard, sequential bar lights (white lens) and 3/4 lights (clear lens)
63282 - plug and play turn signal kit for 14+ RZR, 18+ Ranger: 'L' Rocker switch: (blue), horn / hazard, bolt on lights (12 led) (clear lens) and 3/4 lights (clear lens)
63283 - Led Indicator SET Clear/Amber: bolt on large 2 row
63284 - LED Strip Light SET sequential, forward facing with adhesive mounting, with DRL harness
63295 - plug and play turn signal kit for 14+ RZR, 18+ Ranger: Rocker switch (blue), replacement PRO XP center fang (clear lens)
63296 - plug and play turn signal kit for 14+ RZR, 18+ Ranger: Rocker switch (blue), replacement PRO XP center fang (clear lens) and 3/4 lights (clear lens)
63297 - plug and play turn signal kit for 2025 RZR PRO: Rocker switch (green), replacement fang lights (clear lens)
63298 - plug and play turn signal kit for 14+ RZR, 18+ Ranger: Rocker switch (amber), replacement PRO XP center fang (clear lens)
63299 - plug and play turn signal kit for 14+ RZR, 18+ Ranger: Rocker switch (amber), replacement PRO XP center fang (clear lens) and 3/4 lights (clear lens)
63300 - plug and play turn signal kit for 14+ RZR, 18+ Ranger: Rocker switch (blue), horn / hazard, replacement PRO XP center fang (clear lens)
63301 - plug and play turn signal kit for 14+ RZR, 18+ Ranger: Rocker switch (blue), horn / hazard, replacement PRO XP center fang (clear lens) and 3/4 lights (clear lens)
63302 - plug and play turn signal kit for 14+ RZR, 18+ Ranger: Rocker switch (green), replacement PRO XP center fang (clear lens) and 3/4 lights (clear lens)
63303 - plug and play turn signal kit for 14+ RZR, 18+ Ranger: Rocker switch (blue), replacement PRO XP center fang (clear lens) and 3/4 lights (amber lens)
63304 - plug and play turn signal kit for 14+ RZR, 18+ Ranger: Rocker switch (green), replacement PRO XP center fang (clear lens) and 3/4 lights (amber lens)
63305 - plug and play turn signal kit for 14+ RZR, 18+ Ranger: Rocker switch (amber), replacement PRO XP center fang (clear lens) and 3/4 lights (amber lens)
63306 - Fang light for PRO XP with built in turn signals
63307 - plug and play turn signal kit for 14+ RZR, 18+ Ranger: Rocker switch (blue), horn / hazard, replacement PRO XP center fang (clear lens) and 3/4 lights (amber lens)
63308 - plug and play turn signal kit for 14+ RZR, 18+ Ranger: Rocker switch (amber), horn / hazard, front: harness only
63309 - plug and play turn signal kit for 14+ RZR, 18+ Ranger: Rocker switch (green), horn / hazard, front: harness only
63310 - plug and play turn signal kit for 15-18 RZR: Rocker switch (amber), horn / hazard, front: harness only
63311 - plug and play turn signal kit for 15-18 RZR: Rocker switch (green), horn / hazard, front: harness only
63312 - plug and play turn signal kit for 13+ Ranger 500/570/900: Rocker switch (amber), horn / hazard, front: harness only
63313 - plug and play turn signal kit for 13+ Ranger 500/570/900: Rocker switch (green), horn / hazard, front: harness only
63314 - plug and play turn signal kit for Polaris General: Rocker switch (amber), horn / hazard, front: harness only
63315 - plug and play turn signal kit for Polaris General: Rocker switch (green), horn / hazard, front: harness only
63316 - plug and play turn signal kit for 14+ RZR, 18+ Ranger: Rocker switch (amber), horn / hazard, 3/4 round lights (amber lens)
63317 - plug and play turn signal kit for 14+ RZR, 18+ Ranger: Rocker switch (green), horn / hazard, 3/4 round lights (amber lens)
63318 - plug and play turn signal kit for 15-18 RZR: Rocker switch (amber), horn / hazard, 3/4 round lights (amber lens)
63319 - plug and play turn signal kit for 15-18 RZR: Rocker switch (green), horn / hazard, 3/4 round lights (amber lens)
63320 - plug and play turn signal kit for 13+ Ranger 500/570/900: Rocker switch (amber), horn / hazard, 3/4 round lights (amber lens)
63321 - plug and play turn signal kit for 13+ Ranger 500/570/900: Rocker switch (green), horn / hazard, 3/4 round lights (amber lens)
63322 - plug and play turn signal kit for Polaris General: Rocker switch (amber), horn / hazard, 3/4 round lights (amber lens)
63323 - plug and play turn signal kit for Polaris General: Rocker switch (green), horn / hazard, 3/4 round lights (amber lens)
63324 - plug and play turn signal kit for 14+ RZR, 18+ Ranger: Rocker switch (amber), horn / hazard, 3/4 round lights (clear lens)
63325 - plug and play turn signal kit for 14+ RZR, 18+ Ranger: Rocker switch (green), horn / hazard, 3/4 round lights (clear lens)
63326 - plug and play turn signal kit for 15-18 RZR: Rocker switch (amber), horn / hazard, 3/4 round lights (clear lens)
63327 - plug and play turn signal kit for 15-18 RZR: Rocker switch (green), horn / hazard, 3/4 round lights (clear lens)
63328 - plug and play turn signal kit for 13+ Ranger 500/570/900: Rocker switch (amber), horn / hazard, 3/4 round lights (clear lens)
63329 - plug and play turn signal kit for 13+ Ranger 500/570/900: Rocker switch (green), horn / hazard, 3/4 round lights (clear lens)
63330 - plug and play turn signal kit for Polaris General: Rocker switch (amber), horn / hazard, 3/4 round lights (clear lens)
63331 - plug and play turn signal kit for Polaris General: Rocker switch (green), horn / hazard, 3/4 round lights (clear lens)
63332 - plug and play turn signal kit for 14+ RZR, 18+ Ranger: Rocker switch (amber), horn / hazard, stick-on lights (clear lens) and 3/4 lights (clear lens)
63333 - plug and play turn signal kit for 14+ RZR, 18+ Ranger: Rocker switch (green), horn / hazard, stick-on lights (clear lens) and 3/4 lights (clear lens)
63334 - plug and play turn signal kit for 15-18 RZR: Rocker switch (amber), horn / hazard, stick-on lights (clear lens) and 3/4 lights (clear lens)
63335 - plug and play turn signal kit for 15-18 RZR: Rocker switch (green), horn / hazard, stick-on lights (clear lens) and 3/4 lights (clear lens)
63336 - plug and play turn signal kit for 13+ Ranger 500/570/900: Rocker switch (amber), horn / hazard, stick-on lights (clear lens) and 3/4 lights (clear lens)
63337 - plug and play turn signal kit for 13+ Ranger 500/570/900: Rocker switch (green), horn / hazard, stick-on lights (clear lens) and 3/4 lights (clear lens)
63338 - plug and play turn signal kit for Polaris General: Rocker switch (amber), horn / hazard, stick-on lights (clear lens) and 3/4 lights (clear lens)
63339 - plug and play turn signal kit for Polaris General: Rocker switch (green), horn / hazard, stick-on lights (clear lens) and 3/4 lights (clear lens)
63340 - plug and play turn signal kit for 14+ RZR, 18+ Ranger: Rocker switch (amber), horn / hazard, sequential bar lights (white lens) and 3/4 lights (clear lens)
63341 - plug and play turn signal kit for 14+ RZR, 18+ Ranger: Rocker switch (green), horn / hazard, sequential bar lights (white lens) and 3/4 lights (clear lens)
63342 - plug and play turn signal kit for 15-18 RZR: Rocker switch (amber), horn / hazard, sequential bar lights (white lens) and 3/4 lights (clear lens)
63343 - plug and play turn signal kit for 15-18 RZR: Rocker switch (green), horn / hazard, sequential bar lights (white lens) and 3/4 lights (clear lens)
63344 - plug and play turn signal kit for 13+ Ranger 500/570/900: Rocker switch (amber), horn / hazard, sequential bar lights (white lens) and 3/4 lights (clear lens)
63345 - plug and play turn signal kit for 13+ Ranger 500/570/900: Rocker switch (green), horn / hazard, sequential bar lights (white lens) and 3/4 lights (clear lens)
63346 - plug and play turn signal kit for Polaris General: Rocker switch (amber), horn / hazard, sequential bar lights (white lens) and 3/4 lights (clear lens)
63347 - plug and play turn signal kit for Polaris General: Rocker switch (green), horn / hazard, sequential bar lights (white lens) and 3/4 lights (clear lens)
63348 - plug and play turn signal kit for 14+ RZR, 18+ Ranger: Rocker switch (amber), horn / hazard, bolt on lights (6 led) (clear lens) and 3/4 lights (clear lens)
63349 - plug and play turn signal kit for 14+ RZR, 18+ Ranger: Rocker switch (green), horn / hazard, bolt on lights (6 led) (clear lens) and 3/4 lights (clear lens)
63350 - plug and play turn signal kit for 15-18 RZR: Rocker switch (amber), horn / hazard, bolt on lights (6 led) (clear lens) and 3/4 lights (clear lens)
63351 - plug and play turn signal kit for 15-18 RZR: Rocker switch (green), horn / hazard, bolt on lights (6 led) (clear lens) and 3/4 lights (clear lens)
63352 - plug and play turn signal kit for 13+ Ranger 500/570/900: Rocker switch (amber), horn / hazard, bolt on lights (6 led) (clear lens) and 3/4 lights (clear lens)
63353 - plug and play turn signal kit for 13+ Ranger 500/570/900: Rocker switch (green), horn / hazard, bolt on lights (6 led) (clear lens) and 3/4 lights (clear lens)
63354 - plug and play turn signal kit for Polaris General: Rocker switch (amber), horn / hazard, bolt on lights (6 led) (clear lens) and 3/4 lights (clear lens)
63355 - plug and play turn signal kit for Polaris General: Rocker switch (green), horn / hazard, bolt on lights (6 led) (clear lens) and 3/4 lights (clear lens)
63356 - plug and play turn signal kit for 14+ RZR, 18+ Ranger: Rocker switch (amber), horn / hazard, bolt on lights (12 led) (clear lens) and 3/4 lights (clear lens)
63357 - plug and play turn signal kit for 14+ RZR, 18+ Ranger: Rocker switch (green), horn / hazard, bolt on lights (12 led) (clear lens) and 3/4 lights (clear lens)
63358 - plug and play turn signal kit for 15-18 RZR: Rocker switch (amber), horn / hazard, bolt on lights (12 led) (clear lens) and 3/4 lights (clear lens)
63359 - plug and play turn signal kit for 15-18 RZR: Rocker switch (green), horn / hazard, bolt on lights (12 led) (clear lens) and 3/4 lights (clear lens)
63360 - plug and play turn signal kit for 13+ Ranger 500/570/900: Rocker switch (amber), horn / hazard, bolt on lights (12 led) (clear lens) and 3/4 lights (clear lens)
63361 - plug and play turn signal kit for 13+ Ranger 500/570/900: Rocker switch (green), horn / hazard, bolt on lights (12 led) (clear lens) and 3/4 lights (clear lens)
63362 - plug and play turn signal kit for Polaris General: Rocker switch (amber), horn / hazard, bolt on lights (12 led) (clear lens) and 3/4 lights (clear lens)
63363 - plug and play turn signal kit for Polaris General: Rocker switch (green), horn / hazard, bolt on lights (12 led) (clear lens) and 3/4 lights (clear lens)
63364 - plug and play turn signal kit for 14+ RZR, 18+ Ranger: Rocker switch (amber), horn / hazard, replacement fang lights (clear lens)
63365 - plug and play turn signal kit for 14+ RZR, 18+ Ranger: Rocker switch (green), horn / hazard, replacement fang lights (clear lens)
63366 - plug and play turn signal kit for 14+ RZR, 18+ Ranger: Rocker switch (amber), horn / hazard, replacement PRO XP center fang (clear lens)
63367 - plug and play turn signal kit for 14+ RZR, 18+ Ranger: Rocker switch (green), horn / hazard, replacement PRO XP center fang (clear lens)
63368 - plug and play turn signal kit for 14+ RZR, 18+ Ranger: Rocker switch (amber), horn / hazard, replacement PRO XP center fang (clear lens) and 3/4 lights (amber lens)
63369 - plug and play turn signal kit for 14+ RZR, 18+ Ranger: Rocker switch (green), horn / hazard, replacement PRO XP center fang (clear lens) and 3/4 lights (amber lens)
63370 - plug and play turn signal kit for 14+ RZR, 18+ Ranger: Rocker switch (amber), horn / hazard, replacement PRO XP center fang (clear lens) and 3/4 lights (clear lens)
63371 - plug and play turn signal kit for 14+ RZR, 18+ Ranger: Rocker switch (green), horn / hazard, replacement PRO XP center fang (clear lens) and 3/4 lights (clear lens)
63372 - Horn / hazard add-on for plug and play turn kits - Contura - Amber Backlight
63373 - Horn / hazard add-on for plug and play turn kits - Contura - Green Backlight
63376 - Running light function addon for plug and play turn signal kits with lever switch
63377 - Running light function addon for ROCKER SWITCH plug and play turn signal kits
63381 - plug and play turn signal kit for 19-21 Honda Talon: Rocker switch (amber), front: harness only
63382 - plug and play turn signal kit for 19-21 Honda Talon: Rocker switch (amber), horn / hazard, front: harness only
63383 - plug and play turn signal kit for 19-21 Honda Talon: Rocker switch (green), front: harness only
63384 - plug and play turn signal kit for 19-21 Honda Talon: Rocker switch (green), horn / hazard, front: harness only
63385 - plug and play turn signal kit for 19-21 Honda Talon: Rocker switch (blue), front: harness only
63386 - plug and play turn signal kit for 19-21 Honda Talon: Rocker switch (blue), horn / hazard, front: harness only
63387 - plug and play turn signal kit for 19-21 Honda Talon: Rocker (horizontal) switch: front: harness only
63388 - plug and play turn signal kit for 19-21 Honda Talon: Rocker switch (amber), 3/4 round lights (amber lens)
63389 - plug and play turn signal kit for 19-21 Honda Talon: Rocker switch (amber), horn / hazard, 3/4 round lights (amber lens)
63390 - plug and play turn signal kit for 19-21 Honda Talon: Rocker switch (green), 3/4 round lights (amber lens)
63391 - plug and play turn signal kit for 19-21 Honda Talon: Rocker switch (green), horn / hazard, 3/4 round lights (amber lens)
63392 - plug and play turn signal kit for 19-21 Honda Talon: Rocker switch (blue), 3/4 round lights (amber lens)
63393 - plug and play turn signal kit for 19-21 Honda Talon: Rocker switch (blue), horn / hazard, 3/4 round lights (amber lens)
63394 - plug and play turn signal kit for 19-21 Honda Talon: Rocker (horizontal) switch: 3/4 round lights (amber lens)
63395 - plug and play turn signal kit for 19-21 Honda Talon: Rocker switch (amber), 3/4 round lights (clear lens)
63396 - plug and play turn signal kit for 19-21 Honda Talon: Rocker switch (amber), horn / hazard, 3/4 round lights (clear lens)
63397 - plug and play turn signal kit for 19-21 Honda Talon: Rocker switch (green), 3/4 round lights (clear lens)
63398 - plug and play turn signal kit for 19-21 Honda Talon: Rocker switch (green), horn / hazard, 3/4 round lights (clear lens)
63399 - plug and play turn signal kit for 19-21 Honda Talon: Rocker switch (blue), 3/4 round lights (clear lens)
63400 - plug and play turn signal kit for 19-21 Honda Talon: Rocker switch (blue), horn / hazard, 3/4 round lights (clear lens)
63401 - plug and play turn signal kit for 19-21 Honda Talon: Rocker (horizontal) switch: 3/4 round lights (clear lens)
63402 - plug and play turn signal kit for 19-21 Honda Talon: Rocker switch (amber), stick-on lights (clear lens) and 3/4 lights (clear lens)
63403 - plug and play turn signal kit for 19-21 Honda Talon: Rocker switch (amber), horn / hazard, stick-on lights (clear lens) and 3/4 lights (clear lens)
63404 - plug and play turn signal kit for 19-21 Honda Talon: Rocker switch (green), stick-on lights (clear lens) and 3/4 lights (clear lens)
63405 - plug and play turn signal kit for 19-21 Honda Talon: Rocker switch (green), horn / hazard, stick-on lights (clear lens) and 3/4 lights (clear lens)
63406 - plug and play turn signal kit for 19-21 Honda Talon: Rocker switch (blue), stick-on lights (clear lens) and 3/4 lights (clear lens)
63407 - plug and play turn signal kit for 19-21 Honda Talon: Rocker switch (blue), horn / hazard, stick-on lights (clear lens) and 3/4 lights (clear lens)
63408 - plug and play turn signal kit for 19-21 Honda Talon: Rocker (horizontal) switch: stick-on lights (clear lens) and 3/4 lights (clear lens)
63409 - plug and play turn signal kit for 19-21 Honda Talon: Rocker switch (amber), sequential bar lights (white lens) and 3/4 lights (clear lens)
63410 - plug and play turn signal kit for 19-21 Honda Talon: Rocker switch (amber), horn / hazard, sequential bar lights (white lens) and 3/4 lights (clear lens)
63411 - plug and play turn signal kit for 19-21 Honda Talon: Rocker switch (green), sequential bar lights (white lens) and 3/4 lights (clear lens)
63412 - plug and play turn signal kit for 19-21 Honda Talon: Rocker switch (green), horn / hazard, sequential bar lights (white lens) and 3/4 lights (clear lens)
63413 - plug and play turn signal kit for 19-21 Honda Talon: Rocker switch (blue), sequential bar lights (white lens) and 3/4 lights (clear lens)
63414 - plug and play turn signal kit for 19-21 Honda Talon: Rocker switch (blue), horn / hazard, sequential bar lights (white lens) and 3/4 lights (clear lens)
63415 - plug and play turn signal kit for 19-21 Honda Talon: Rocker (horizontal) switch: sequential bar lights (white lens) and 3/4 lights (clear lens)
63416 - plug and play turn signal kit for 19-21 Honda Talon: Rocker switch (amber), bolt on lights (6 led) (clear lens) and 3/4 lights (clear lens)
63417 - plug and play turn signal kit for 19-21 Honda Talon: Rocker switch (amber), horn / hazard, bolt on lights (6 led) (clear lens) and 3/4 lights (clear lens)
63418 - plug and play turn signal kit for 19-21 Honda Talon: Rocker switch (green), bolt on lights (6 led) (white lens) and 3/4 lights (clear lens)
63419 - plug and play turn signal kit for 19-21 Honda Talon: Rocker switch (green), horn / hazard, bolt on lights (6 led) (clear lens) and 3/4 lights (clear lens)
63420 - plug and play turn signal kit for 19-21 Honda Talon: Rocker switch (blue), bolt on lights (6 led) (clear lens) and 3/4 lights (clear lens)
63421 - plug and play turn signal kit for 19-21 Honda Talon: Rocker switch (blue), horn / hazard, bolt on lights (6 led) (clear lens) and 3/4 lights (clear lens)
63422 - plug and play turn signal kit for 19-21 Honda Talon: Rocker (horizontal) switch: bolt on lights (6 led) (clear lens) and 3/4 lights (clear lens)
63423 - plug and play turn signal kit for 19-21 Honda Talon: Rocker switch (amber), bolt on lights (12 led) (clear lens) and 3/4 lights (clear lens)
63425 - plug and play turn signal kit for 19-21 Honda Talon: Rocker switch (green), bolt on lights (12 led) (white lens) and 3/4 lights (clear lens)
63426 - plug and play turn signal kit for 19-21 Honda Talon: Rocker switch (green), horn / hazard, bolt on lights (12 led) (clear lens) and 3/4 lights (clear lens)
63427 - plug and play turn signal kit for 19-21 Honda Talon: Rocker switch (blue), bolt on lights (12 led) (clear lens) and 3/4 lights (clear lens)
63428 - plug and play turn signal kit for 19-21 Honda Talon: Rocker switch (blue), horn / hazard, bolt on lights (12 led) (clear lens) and 3/4 lights (clear lens)
63429 - plug and play turn signal kit for 19-21 Honda Talon: Rocker (horizontal) switch: bolt on lights (12 led) (clear lens) and 3/4 lights (clear lens)
63430 - Plug N Play REAR T: Talon
63435 - Pro XP front lights with turn signals
63436 - plug and play turn signal kit for 14+ RZR, 18+ Ranger: Rocker switch (amber), replacement Pro XP Headlights (clear lens)
63437 - plug and play turn signal kit for 20-24 RZR Pro XP, Pro R and Turbo R: Rocker switch (amber), horn / hazard, replacement Pro XP Headlights (clear lens)
63438 - plug and play turn signal kit for 14+ RZR, 18+ Ranger: Rocker switch (green), replacement Pro XP Headlights (clear lens)
63439 - plug and play turn signal kit for 14+ RZR, 18+ Ranger: Rocker switch (green), horn / hazard, replacement Pro XP Headlights (clear lens)
63440 - plug and play turn signal kit for 14+ RZR, 18+ Ranger: Rocker switch (blue), replacement Pro XP Headlights (clear lens)
63441 - plug and play turn signal kit for 14+ RZR, 18+ Ranger: Rocker switch (blue), horn / hazard, replacement LED Pro XP Headlights
63442 - plug and play turn signal kit for 14+ RZR, 18+ Ranger: Rocker switch (amber), PRO XP headlights and center fang (clear lens)
63443 - plug and play turn signal kit for 14+ RZR, 18+ Ranger: Rocker switch (amber), horn / hazard, PRO XP headlights and center fang (clear lens)
63444 - plug and play turn signal kit for 14+ RZR, 18+ Ranger: Rocker switch (green), PRO XP headlights and center fang (clear lens)
63445 - plug and play turn signal kit for 14+ RZR, 18+ Ranger: Rocker switch (green), horn / hazard, PRO XP headlights and center fang (clear lens)
63446 - plug and play turn signal kit for 14+ RZR, 18+ Ranger: Rocker switch (blue), PRO XP headlights and center fang (clear lens)
63447 - plug and play turn signal kit for 14+ RZR, 18+ Ranger: Rocker switch (blue), horn / hazard, PRO XP headlights and center fang (clear lens)
63448 - Fang Light Set with Smoke Lens for 19+ RZR XP 1000, Turbo, Turbo S
63449 - plug and play turn signal kit for 14+ RZR, 18+ Ranger: Rocker switch (amber), replacement fang lights (smoke lens)
63450 - plug and play turn signal kit for 14+ RZR, 18+ Ranger: Rocker switch (amber), horn / hazard, replacement fang lights (smoke lens)
63451 - plug and play turn signal kit for 14+ RZR, 18+ Ranger: Rocker switch (green), replacement fang lights (smoke lens)
63452 - plug and play turn signal kit for 14+ RZR, 18+ Ranger: Rocker switch (green), horn / hazard, replacement fang lights (smoke lens)
63453 - plug and play turn signal kit for 14+ RZR, 18+ Ranger: Rocker switch (blue), replacement fang lights (smoke lens)
63454 - plug and play turn signal kit for 14+ RZR, 18+ Ranger: Rocker switch (blue), horn / hazard, replacement fang lights (smoke lens)
63455 - plug and play turn signal kit for 14+ RZR, 18+ Ranger: Lever switch: (black), horn / hazard, replacement fang lights (smoke lens)
63498 - Trailer marker light module: Marker lights flash with turn
63509 - Steering column bracket assy for lever switch
63517 - LED DRL Tube 27.8cm
63518 - LED DRL Ballast 27.8cm
63519 - LED DRL Tube Set With Ballast For Polaris General
63521 - plug and play turn signal kit for 14+ RZR Rocker switch (amber), teardrop lights (white lens)
63522 - plug and play turn signal kit for Polaris General: Rocker switch (amber), teardrop lights (white lens)
63523 - Plug and Play Turn Signal Kit with Vertical Horn/Hazard for 14+ RZR with tube lights
63524 - plug and play turn signal kit for Polaris General: Rocker switch (amber), horn / hazard, teardrop lights (white lens)
63525 - plug and play turn signal kit for 14+ RZR: Rocker switch (green), teardrop lights (white lens)
63526 - plug and play turn signal kit for Polaris General: Rocker switch (green), teardrop lights (clear lens)
63527 - plug and play turn signal kit for 14+ RZR: Rocker switch (green), horn / hazard, teardrop lights (white lens)
63528 - plug and play turn signal kit for Polaris General: Rocker switch (green), horn / hazard, teardrop lights (white lens)
63529 - plug and play turn signal kit for 14+ RZR: Rocker switch (blue), teardrop lights (white lens)
63530 - plug and play turn signal kit for Polaris General: Rocker switch (blue), teardrop lights (white lens)
63531 - plug and play turn signal kit for 19-23 RZR: Rocker switch (blue), horn / hazard, teardrop lights (white lens)
63532 - plug and play turn signal kit for Polaris General: Rocker switch (blue), horn / hazard, teardrop lights (white lens)
63533 - plug and play turn signal kit for 14+ RZR: Rocker (horizontal) switch: teardrop lights (white lens)
63534 - plug and play turn signal kit for Polaris General: Rocker (horizontal) switch: teardrop lights (white lens)
63537 - plug and play turn signal kit for 14+ RZR: Lever switch: (black), hazard, teardrop lights (white lens)
63538 - plug and play turn signal kit for Polaris General: Lever switch: (black), hazard, teardrop lights (clear lens)
63539 - plug and play turn signal kit for 14+ RZR: Lever switch: (black), horn / hazard, teardrop lights (clear lens)
63540 - plug and play turn signal kit for Polaris General: Lever switch: (black), horn / hazard, teardrop lights (white lens)
63548 - plug and play turn signal kit for 14+ RZR: Rocker switch (amber), teardrop lights (white lens) and 3/4 lights (clear lens)
63549 - plug and play turn signal kit for Polaris General: Rocker switch (amber), teardrop lights (white lens) and 3/4 lights (clear lens)
63550 - plug and play turn signal kit for 14+ RZR: Rocker switch (amber), horn / hazard, teardrop lights (white lens) and 3/4 lights (clear lens)
63551 - plug and play turn signal kit for Polaris General: Rocker switch (amber), horn / hazard, teardrop lights (white lens) and 3/4 lights (clear lens)
63552 - plug and play turn signal kit for 14+ RZR: Rocker switch (green), teardrop lights (white lens) and 3/4 lights (clear lens)
63553 - plug and play turn signal kit for Polaris General: Rocker switch (green), teardrop lights (clear lens) and 3/4 lights (clear lens)
63557 - plug and play turn signal kit for Polaris General: Rocker switch (green), horn / hazard, teardrop lights (white lens) and 3/4 lights (clear lens)
63558 - plug and play turn signal kit for 14+ RZR: Rocker switch (blue), teardrop lights (white lens) and 3/4 lights (clear lens)
63559 - plug and play turn signal kit for Polaris General: Rocker switch (blue), teardrop lights (white lens) and 3/4 lights (clear lens)
63560 - plug and play turn signal kit for 19-23 RZR: Rocker switch (blue), horn / hazard, teardrop lights (white lens) and 3/4 lights (clear lens)
63561 - plug and play turn signal kit for Polaris General: Rocker switch (blue), horn / hazard, teardrop lights (white lens) and 3/4 lights (clear lens)
63562 - plug and play turn signal kit for 14+ RZR: Rocker (horizontal) switch: teardrop lights (white lens) and 3/4 lights (clear lens)
63563 - plug and play turn signal kit for Polaris General: Rocker (horizontal) switch: teardrop lights (white lens) and 3/4 lights (clear lens)
63566 - plug and play turn signal kit for 19-23 Polaris RZR: Lever switch (black), hazard, teardrop lights (white lens) and 3/4 lights (clear lens)
63567 - plug and play turn signal kit for Polaris General: Lever switch: (black), hazard, teardrop lights (clear lens) and 3/4 lights (clear lens)
63568 - plug and play turn signal kit for 14+ RZR: Lever switch (black), horn / hazard, teardrop lights (white lens) and 3/4 lights (clear lens)
63569 - plug and play turn signal kit for Polaris General: Lever switch: (black), horn / hazard, teardrop lights (white lens) and 3/4 lights (clear lens)
63576 - plug and play turn signal kit for 14+ RZR: Rocker switch (green), horn / hazard, teardrop lights (white lens) and 3/4 lights (clear lens)
63584 - LED DRL Tube Set With Ballast For Polaris Ranger
63591 - UPGRADE KIT - Lever Switch Turn signals from 900 to 920 with horn (Version 1 Kit ONLY)
63595 - Fang Lights for Polaris General - SET
63596 - plug and play turn signal kit for Polaris General: Rocker switch (amber), fang lights (clear lens)
63597 - plug and play turn signal kit for Polaris General: Rocker switch (amber), fang lights (white lens) and 3/4 lights (clear lens)
63598 - plug and play turn signal kit for Polaris General: Rocker switch (amber), horn / hazard, fang lights (white lens)
63599 - plug and play turn signal kit for Polaris General: Rocker switch (amber), horn / hazard, fang lights (white lens) and 3/4 lights (clear lens)
63600 - plug and play turn signal kit for Polaris General: Rocker switch (green), fang lights (clear lens)
63601 - plug and play turn signal kit for Polaris General: Rocker switch (green), fang lights (clear lens) and 3/4 lights (clear lens)
63602 - plug and play turn signal kit for Polaris General: Rocker switch (green), horn / hazard, fang lights (white lens)
63603 - plug and play turn signal kit for Polaris General: Rocker switch (green), horn / hazard, fang lights (white lens) and 3/4 lights (clear lens)
63604 - plug and play turn signal kit for Polaris General: Rocker switch (blue), fang lights (white lens)
63605 - plug and play turn signal kit for Polaris General: Rocker switch (blue), fang lights (white lens) and 3/4 lights (clear lens)
63606 - plug and play turn signal kit for Polaris General: Rocker switch (blue), horn / hazard, fang lights (white lens)
63607 - plug and play turn signal kit for Polaris General: Rocker switch (blue), horn / hazard, fang lights (white lens) and 3/4 lights (clear lens)
63608 - plug and play turn signal kit for Polaris General: Rocker (horizontal) switch: fang lights (white lens)
63609 - plug and play turn signal kit for Polaris General: Rocker (horizontal) switch: fang lights (white lens) and 3/4 lights (clear lens)
63612 - plug and play turn signal kit for Polaris General: Lever switch: (black), hazard, fang lights (clear lens)
63613 - plug and play turn signal kit for Polaris General: Lever switch: (black), hazard, fang lights (clear lens) and 3/4 lights (clear lens)
63614 - plug and play turn signal kit for Polaris General: Lever switch: (black), horn / hazard, fang lights (white lens)
63615 - plug and play turn signal kit for Polaris General: Lever switch: (black), horn / hazard, fang lights (white lens) and 3/4 lights (clear lens)
63618 - plug and play turn signal kit for 18+ Ranger: Lever switch: (black), hazard, front: crush tube lights
63619 - plug and play turn signal kit for 18+ Ranger: Lever switch: (black), horn / hazard, front: crush tube LEDs
63620 - plug and play turn signal kit for 18+ Ranger: 'L' Rocker switch: (blue), LED Crush Tube Lights
63621 - plug and play turn signal kit for 18+ Ranger: 'L' Rocker switch: (blue), hazard, front: crush tube LEDs
63622 - LED DRL Tube 50cm
63625 - plug and play turn signal kit for 24+ RZR XP 1000: Lever switch: (black), horn / hazard, 3/4 round lights (amber lens)
63626 - plug and play turn signal kit for 2024 RZR XP 1000: Lever switch: (black), horn / hazard, front: harness only
63627 - plug and play turn signal kit for 2024 RZR XP 1000: Lever switch: (black), horn / hazard, 3/4 round lights (clear lens)
63628 - plug and play turn signal kit for 2024 RZR 1000 XP: Lever switch: (black), horn / hazard, stick-on lights (clear lens) and 3/4 lights (clear lens)
63629 - plug and play turn signal kit for 2024 RZR XP 1000: Lever switch: (black), horn / hazard, sequential bar lights (white lens) and 3/4 lights (clear lens)
63630 - plug and play turn signal kit for 2024 RZR XP 1000: Lever switch: (black), horn / hazard, bolt on lights (6 led) (clear lens) and 3/4 lights (clear lens)
63631 - plug and play turn signal kit for 2024 RZR XP 1000: Lever switch: (black), horn / hazard, bolt on lights (12 led) (clear lens) and 3/4 lights (clear lens)
63632 - plug and play turn signal kit for 2024 RZR XP 1000: Lever switch: (black), hazard, front: harness only
63633 - plug and play turn signal kit for 2024 RZR XP 1000: Lever switch: (black), hazard, 3/4 round lights (amber lens)
63634 - plug and play turn signal kit for 2024 RZR XP 1000: Lever switch: (black), hazard, 3/4 round lights (clear lens)
63635 - plug and play turn signal kit for 2024 RZR XP 1000: Lever switch: (black), hazard, stick-on lights (clear lens) and 3/4 lights (clear lens)
63636 - plug and play turn signal kit for 2024 RZR XP 1000: Lever switch: (black), hazard, sequential bar lights (white lens) and 3/4 lights (clear lens)
63637 - plug and play turn signal kit for 2024 RZR XP 1000: Lever switch: (black), hazard, bolt on lights (6 led) (clear lens) and 3/4 lights (clear lens)
63638 - plug and play turn signal kit for 2024 RZR XP 1000: Lever switch: (black), hazard, bolt on lights (12 led) (clear lens) and 3/4 lights (clear lens)
63642 - plug and play turn signal kit for 24 RZR XP 1000: Rocker (horizontal) switch: horn / hazard, 3/4 round lights (amber lens)
63643 - plug and play turn signal kit for 2024 RZR XP 1000: Rocker (horizontal) switch: front: harness only
63644 - plug and play turn signal kit for 2024 RZR XP 1000: Rocker (horizontal) switch: 3/4 round lights (amber lens)
63645 - plug and play turn signal kit for 2024 RZR XP 1000: Rocker (horizontal) switch: 3/4 round lights (clear lens)
63646 - plug and play turn signal kit for 2024 RZR XP 1000: Rocker (horizontal) switch: stick-on lights (clear lens) and 3/4 lights (clear lens)
63647 - plug and play turn signal kit for 2024 RZR XP 1000: Rocker (horizontal) switch: sequential bar lights (white lens) and 3/4 lights (clear lens)
63648 - plug and play turn signal kit for 2024 RZR XP 1000: Rocker (horizontal) switch: bolt on lights (6 led) (clear lens) and 3/4 lights (clear lens)
63649 - plug and play turn signal kit for 2024 RZR XP 1000: Rocker (horizontal) switch: bolt on lights (12 led) (clear lens) and 3/4 lights (clear lens)
63650 - plug and play turn signal kit for 2024 RZR XP 1000: Rocker switch (blue), horn / hazard, front: harness only
63651 - plug and play turn signal kit for 2024 RZR XP 1000: Rocker switch (blue), horn / hazard, 3/4 round lights (amber lens)
63652 - plug and play turn signal kit for 2024 RZR XP 1000: Rocker switch (blue), horn / hazard, 3/4 round lights (clear lens)
63653 - plug and play turn signal kit for 2024 RZR XP 1000: Rocker switch (blue), horn / hazard, stick-on lights (clear lens) and 3/4 lights (clear lens)
63654 - Plug and Play Turn Signal Kit with Vertical Horn/Hazard for 2024 RZR XP 1000 - forward facing stick-on lights
63655 - plug and play turn signal kit for 2024 RZR XP 1000: Rocker switch (blue), horn / hazard, bolt on lights (6 led) (clear lens) and 3/4 lights (clear lens)
63656 - plug and play turn signal kit for 2024 RZR XP 1000: Rocker switch (blue), horn / hazard, bolt on lights (12 led) (clear lens) and 3/4 lights (clear lens)
63657 - plug and play turn signal kit for 2024 RZR XP 1000: Rocker switch (blue), front: harness only
63658 - plug and play turn signal kit for 2024 RZR XP 1000: Rocker switch (blue), 3/4 round lights (amber lens)
63659 - plug and play turn signal kit for 2024 RZR XP 1000: Rocker switch (blue), 3/4 round lights (clear lens)
63660 - plug and play turn signal kit for 2024 RZR XP 1000: Rocker switch (blue), stick-on lights (clear lens) and 3/4 lights (clear lens)
63661 - plug and play turn signal kit for 2024 RZR XP 1000: Rocker switch (blue), sequential bar lights (white lens) and 3/4 lights (clear lens)
63662 - plug and play turn signal kit for 2024 RZR XP 1000: Rocker switch (blue), bolt on lights (6 led) (clear lens) and 3/4 lights (clear lens)
63663 - plug and play turn signal kit for 2024 RZR XP 1000: Rocker switch (blue), bolt on lights (12 led) (clear lens) and 3/4 lights (clear lens)
63664 - plug and play turn signal kit for 2024 RZR XP 1000: Rocker switch (green), horn / hazard, front: harness only
63665 - plug and play turn signal kit for 2024 RZR XP 1000: Rocker switch (green), horn / hazard, 3/4 round lights (amber lens)
63666 - plug and play turn signal kit for 2024 RZR XP 1000: Rocker switch (green), horn / hazard, 3/4 round lights (clear lens)
63667 - plug and play turn signal kit for 2024 RZR XP 1000: Rocker switch (green), horn / hazard, stick-on lights (clear lens) and 3/4 lights (clear lens)
63668 - plug and play turn signal kit for 2024 RZR XP 1000: Rocker switch (green), horn / hazard, sequential bar lights (white lens) and 3/4 lights (clear lens)
63669 - plug and play turn signal kit for 2024 RZR XP 1000: Rocker switch (green), horn / hazard, bolt on lights (6 led) (clear lens) and 3/4 lights (clear lens)
63670 - plug and play turn signal kit for 2024 RZR XP 1000: Rocker switch (green), horn / hazard, bolt on lights (12 led) (clear lens) and 3/4 lights (clear lens)
63671 - plug and play turn signal kit for 2024 RZR XP 1000: Rocker switch (green), front: harness only
63672 - plug and play turn signal kit for 2024 RZR XP 1000: Rocker switch (green), 3/4 round lights (amber lens)
63673 - plug and play turn signal kit for 2024 RZR XP 1000: Rocker switch (green), 3/4 round lights (clear lens)
63674 - plug and play turn signal kit for 2024 RZR XP 1000: Rocker switch (green), stick-on lights (clear lens) and 3/4 lights (clear lens)
63675 - plug and play turn signal kit for 2024 RZR XP 1000: Rocker switch (green), sequential bar lights (white lens) and 3/4 lights (clear lens)
63676 - plug and play turn signal kit for 2024 RZR XP 1000: Rocker switch (green), bolt on lights (6 led) (clear lens) and 3/4 lights (clear lens)
63677 - plug and play turn signal kit for 2024 RZR XP 1000: Rocker switch (green), bolt on lights (12 led) (clear lens) and 3/4 lights (clear lens)
63678 - plug and play turn signal kit for 2024 RZR XP 1000: Rocker switch (amber), horn / hazard, front: harness only
63679 - plug and play turn signal kit for 2024 RZR XP 1000: Rocker switch (amber), horn / hazard, 3/4 round lights (amber lens)
63680 - plug and play turn signal kit for 2024 RZR XP 1000: Rocker switch (amber), horn / hazard, 3/4 round lights (clear lens)
63681 - plug and play turn signal kit for 2024 RZR XP 1000: Rocker switch (amber), horn / hazard, stick-on lights (clear lens) and 3/4 lights (clear lens)
63682 - plug and play turn signal kit for 2024 RZR XP 1000: Rocker switch (amber), horn / hazard, sequential bar lights (white lens) and 3/4 lights (clear lens)
63683 - plug and play turn signal kit for 2024 RZR XP 1000: Rocker switch (amber), horn / hazard, bolt on lights (6 led) (clear lens) and 3/4 lights (clear lens)
63684 - plug and play turn signal kit for 2024 RZR XP 1000: Rocker switch (amber), horn / hazard, bolt on lights (12 led) (clear lens) and 3/4 lights (clear lens)
63685 - plug and play turn signal kit for 2024 RZR XP 1000: Rocker switch (amber), front: harness only
63686 - plug and play turn signal kit for 2024 RZR XP 1000: Rocker switch (amber), 3/4 round lights (amber lens)
63687 - plug and play turn signal kit for 2024 RZR XP 1000: Rocker switch (amber), 3/4 round lights (clear lens)
63688 - plug and play turn signal kit for 2024 RZR XP 1000: Rocker switch (amber), stick-on lights (clear lens) and 3/4 lights (clear lens)
63689 - plug and play turn signal kit for 2024 RZR XP 1000: Rocker switch (amber), sequential bar lights (white lens) and 3/4 lights (clear lens)
63690 - plug and play turn signal kit for 2024 RZR XP 1000: Rocker switch (amber), bolt on lights (6 led) (clear lens) and 3/4 lights (clear lens)
63691 - plug and play turn signal kit for 2024 RZR XP 1000: Rocker switch (amber), bolt on lights (12 led) (clear lens) and 3/4 lights (clear lens)
63694 - Whip light harness for plug and play turn signal kits
63695 - plug and play turn signal kit for 18+ Ranger: 'L' Rocker switch: (blue), horn/hazard, front: crush tube LEDs
63697 - plug and play turn signal kit for 2024 RZR XP 1000: Rocker switch (amber), with front fang light
63698 - plug and play turn signal kit for 2024 RZR XP 1000: Rocker switch (amber), horn / hazard, with front fang light
63699 - plug and play turn signal kit for 2024 RZR XP 1000: Rocker switch (green), with front fang light
63700 - plug and play turn signal kit for 2024 RZR XP 1000: Rocker switch (green), horn / hazard, with front fang light
63701 - plug and play turn signal kit for 2024 RZR XP 1000: Rocker switch (blue), with front fang light
63702 - plug and play turn signal kit for 2024 RZR XP 1000: Rocker switch (blue), horn / hazard, with front fang light
63703 - plug and play turn signal kit for 2024 RZR XP 1000: Rocker (horizontal) switch, with front fang light
63704 - plug and play turn signal kit for 24 RZR XP 1000: Rocker (horizontal) switch: horn / hazard, with front fang light
63706 - plug and play turn signal kit for 2024 RZR XP 1000: Lever switch: (black), hazard, with front fang light
63707 - plug and play turn signal kit for 2024 RZR XP 1000: Lever switch: (black), horn / hazard, with front fang light
63708 - Fang light for 24+ RZR 1000 with built in turn signals
63709 - U-bracket for plug and play turn signal lever switch
63711 - plug and play turn signal kit for 2024 RZR XP 1000: Rocker switch (amber), Fang and 3/4 round lights
63712 - plug and play turn signal kit for 2024 RZR XP 1000: Rocker switch (amber), horn / hazard, with front fang light and 3/4 round lights
63713 - plug and play turn signal kit for 2024 RZR XP 1000: Rocker switch (green), with front fang light and 3/4 round lights
63714 - plug and play turn signal kit for 2024 RZR XP 1000: Rocker switch (green), horn / hazard, with front fang light and 3/4 round lights
63715 - plug and play turn signal kit for 2024 RZR XP 1000: Rocker switch (blue), with front fang light and 3/4 round lights
63716 - plug and play turn signal kit for 2024 RZR XP 1000: Rocker switch (blue), horn / hazard, with front fang light and 3/4 round lights
63717 - plug and play turn signal kit for 2024 RZR XP 1000: Rocker (horizontal) switch, with front fang light and 3/4 round lights
63718 - plug and play turn signal kit for 24 RZR XP 1000: Rocker (horizontal) switch: horn / hazard, with front fang light and 3/4 round lights
63720 - plug and play turn signal kit for 2024 RZR XP 1000: Lever switch: (black), hazard, with front fang light and 3/4 round lights
63721 - plug and play turn signal kit for 2024 RZR XP 1000: Lever switch: (black), horn / hazard, with front fang light and 3/4 round lights
63722 - plug and play turn signal kit for 18+ Ranger: 'L' Rocker switch: (blue), LED Crush Tube and 3/4 Lights
63723 - plug and play turn signal kit for 18+ Ranger: 'L' Rocker switch: (blue), hazard, front: crush tube and round LEDs
63724 - plug and play turn signal kit for 18+ Ranger: 'L' Rocker switch: (blue), horn/hazard, front: crush tube and round LEDs
63725 - plug and play turn signal kit for 18+ Ranger: Lever switch: (black), hazard, front: crush tube and round lights
63726 - plug and play turn signal kit for 18+ Ranger: Lever switch: (black), horn / hazard, front: crush tube and round LEDs
63728 - Cap removal tool for Polaris dash cluster plug to be used with plug and play cluster tie-in harness
63787 - plug and play turn signal kit for 13+ Ranger 500/570/900: Rocker switch (amber), crush tubes
63788 - plug and play turn signal kit for 13+ Ranger 500/570/900: Rocker switch (amber), crush tube and 3/4 LEDs
63789 - plug and play turn signal kit for 13+ Ranger 500/570/900: Rocker switch (amber), horn / hazard, front: crush tubes
63790 - plug and play turn signal kit for 13+ Ranger 500/570/900: Rocker switch (amber), horn / hazard, front: crush tube and 3/4 LEDs
63791 - plug and play turn signal kit for 13+ Ranger 500/570/900: Rocker switch (green), front: crush tubes
63792 - plug and play turn signal kit for 13+ Ranger 500/570/900: Rocker switch (green), front: crush tube and 3/4 LEDs
63793 - plug and play turn signal kit for 13+ Ranger 500/570/900: Rocker switch (green), horn / hazard, front: crush tubes
63794 - plug and play turn signal kit for 13+ Ranger 500/570/900: Rocker switch (green), horn / hazard, front: crush tube and 3/4 LEDs
63795 - plug and play turn signal kit for 13+ Ranger 500/570/900: Rocker switch (blue), front: crush tubes
63796 - plug and play turn signal kit for 13+ Ranger 500/570/900: Rocker switch (blue), front: crush tube and 3/4 LEDs
63797 - plug and play turn signal kit for 13+ Ranger 500/570/900: Rocker switch (blue), horn / hazard, front: crush tubes
63798 - plug and play turn signal kit for 13+ Ranger 500/570/900: Rocker switch (blue), horn / hazard, front: crush tube and 3/4 LEDs
63799 - plug and play turn signal kit for 13+ Ranger 500/570/900: Rocker (horizontal) switch: front: crush tubes
63800 - plug and play turn signal kit for 13+ Ranger 500/570/900: Rocker (horizontal) switch: front: crush tube and 3/4 LEDs
63803 - plug and play turn signal kit for 13+ Ranger 500/570/900: Lever switch: (black), hazard, front: crush tubes
63804 - plug and play turn signal kit for 13+ Ranger 500/570/900: Lever switch: (black), hazard, front: crush tube and 3/4 LEDs
63805 - plug and play turn signal kit for 13+ Ranger 500/570/900: Lever switch: (black), horn / hazard, front: crush tubes
63806 - plug and play turn signal kit for 13+ Ranger 500/570/900: Lever switch: (black), horn / hazard, front: crush tube and 3/4 LEDs
63807 - plug and play turn signal kit for 2024 RZR XP 1000: Rocker switch (amber), Fang and sequential
63808 - plug and play turn signal kit for 2024 RZR XP 1000: Rocker switch (amber), horn / hazard, fang and sequential
63809 - plug and play turn signal kit for 2024 RZR XP 1000: Rocker switch (green), fang and sequential
63810 - plug and play turn signal kit for 2024 RZR XP 1000: Rocker switch (green), horn / hazard, fang and sequential
63811 - plug and play turn signal kit for 2024 RZR XP 1000: Rocker switch (blue), fang and sequential
63812 - plug and play turn signal kit for 2024 RZR XP 1000: Rocker switch (blue), horn / hazard, fang and sequential
63813 - plug and play turn signal kit for 2024 RZR XP 1000: Rocker (horizontal) switch, fang and sequential
63814 - plug and play turn signal kit for 24 RZR XP 1000: Rocker (horizontal) switch: horn / hazard, fang and sequential
63816 - plug and play turn signal kit for 2024 RZR XP 1000: Lever switch: (black), hazard, fang and sequential
63817 - plug and play turn signal kit for 2024 RZR XP 1000: Lever switch: (black), horn / hazard, fang and sequential
63846 - Plug and Play Conversion Kit: Lever non-horn to OEM Style Rocker with Horn/Hazard
63878 - Swap the harness that I returned for the 24+ rear T harness
63879 - Swap the harness that I returned for the 19-23 rear T harness
63880 - Swap the harness that I returned for the 15-18 rear T harness
63881 - Swap the harness that I returned for the 570 rear T harness
63882 - Swap the harness that I returned for the Polaris General rear T harness
63883 - Swap the harness that I returned for the Talon rear T harness
63894 - Small grille insert light set (6) for no drill installation of 3/4 round turn signals
63895 - Large grille insert light set (4) for no drill installation of 3/4 round turn signals ONLY for 2025 Ranger 1000 XP
63909 - LED Add-On Kit (amber lens) for Plug and Play Turn Signal Kits 2025 Ranger XP 1000 ONLY
63910 - LED Press - In Add-On Kit (clear lens) for Plug and Play Turn Signal Kits 2025 Ranger XP 1000 ONLY
63911 - Grille insert light set (4) for no drill installation of 3/4 round turn signals ONLY for 2018 to 2024 Ranger 1000 XP
63912 - LED Add-On Kit (clear lens) for Plug and Play Turn Signal Kits 2019-2024 Ranger XP 1000 ONLY
63913 - LED Add-On Kit (amber lens) for Plug and Play Turn Signal Kits 2019-2024 Ranger XP 1000 ONLY
63914 - Grille insert kit (amber lens) for no drill installation of 3/4 round turn signals ONLY for 2019 to 2024 Ranger 1000 XP
63915 - Large grille insert light kit SET OF 4 (amber lens) for no drill installation of 3/4 round turn signals ONLY for 2025 Ranger 1000 XP
63917 - UPGRADE KIT - Lever Switch Turn signals from 900 to 920 with horn (Version 2 Kit ONLY)
63928 - Bumper Light Add-On For 25 Polaris Ranger XP 1000 bumper with rocker switch harness
63929 - Bumper Light Add-On Kit For 25 Polaris Ranger XP 1000 bumper - Connects to Tube Kits
63931 - Replacement Headlights With Turn Signals for Polaris Ranger 1000 2018+
63933 - V2 utv FRONT HARNESS
63935 - Large grille insert set (4) for no drill installation of 3/4 round turn signals ONLY for 2025 Ranger 1000 XP
63936 - Grille insert set (4) for no drill installation of 3/4 round turn signals ONLY for 2019 to 2024 Ranger 1000 XP
63937 - Grille insert set (4) for no drill installation of 3/4 round turn signals ONLY for Polaris Ranger NON XP
63938 - plug and play turn signal kit for 2025 Ranger XP 1000: Lever switch: (black), hazard, grille insert lights
63941 - plug and play turn signal kit for 18-24 Ranger XP 1000: Lever switch: (black), hazard, grille insert lights
63943 - plug and play turn signal kit for 2025 Ranger 1000 XP: Lever switch: (black), horn / hazard, grille insert lights
63945 - plug and play turn signal kit for 18-24 Ranger 1000 XP: Lever switch: (black), horn / hazard, grille insert lights
63946 - plug and play turn signal kit for 18-25 Ranger XP 1000: Lever switch: (black), hazard, replacement headlights
63947 - plug and play turn signal kit for 18-25 Ranger 1000 XP: Lever switch: (black), horn / hazard, replacement headlights
63948 - plug and play turn signal kit for 2025 Ranger 1000 XP: 'L' Rocker switch: (blue), grille insert lights
63949 - plug and play turn signal kit for 18-24 Ranger 1000 XP: 'L' Rocker switch: (blue), grille insert lights
63950 - plug and play turn signal kit for 18-25 Ranger 1000 XP: 'L' Rocker switch: (blue), replacement headlights with turn signals
63951 - plug and play turn signal kit for 2025 Ranger 1000 XP: 'L' Rocker switch: (blue), horn / hazard, grille insert lights
63952 - plug and play turn signal kit for 18-24 Ranger 1000 XP: 'L' Rocker switch: (blue), horn / hazard, grille insert lights
63953 - plug and play turn signal kit for 18-24 Ranger 1000 XP: 'L' Rocker switch: (blue), horn / hazard, replacement headlights
63957 - Bumper Light Set Polaris XD 1500 / Ranger 1000 with 1500XD Style bumper
63958 - plug and play turn signal kit for 2025+ Ranger 1000 XP: Lever switch: (black), horn / hazard, HD bumper lights
63959 - plug and play turn signal kit for Ranger XP 1000 with HD bumper Lever switch: (black), hazard, bumper lights
63960 - plug and play turn signal kit for Ranger 1000 XP with HD bumper: 'L' Rocker switch: (blue), bumper lights
63961 - plug and play turn signal kit for Ranger 1000 XP (with HD bumper): 'L' Rocker switch: (blue), horn / hazard, bumper lights
63962 - plug and play turn signal kit for XPEDITION: Lever switch: (black), hazard, crush tubes
63963 - plug and play turn signal kit for XPEDITION: Lever switch: (black), horn / hazard, crush tubes
63964 - plug and play turn signal kit for XPEDITION: Rocker switch (blue), tube lights (white lens)
63965 - plug and play turn signal kit for XPEDITION: Rocker switch (green), tube lights (white lens)
63966 - plug and play turn signal kit for XPEDITION: Rocker switch (amber), tube lights (white lens)
63967 - plug and play turn signal kit for XPEDITION: Rocker switch (blue), horn / hazard, tube lights
63968 - plug and play turn signal kit for XPEDITION: Rocker switch (green), horn / hazard, tube lights
63969 - plug and play turn signal kit for XPEDITION: Rocker switch (amber), horn / hazard, tube lights
63972 - Bumper light add-on harness for Kit Tie-In
63973 - Universal harnes with rocker switch for Bumper Light Add-On For Polaris XD 1500
63980 - Grille insert light set (4) for no drill installation of 3/4 round turn signals ONLY for Ranger NON XP
63981 - LED Add-On Kit (clear lens) for Plug and Play Turn Signal Kits Ranger NON XP ONLY
63985 - Bumper light insert seals SET bezel grommet
63991 - Sequential Bumper Light Set for 2025 Ranger with HD Bumper
63992 - plug and play turn signal kit for Ranger 1000 XP with HD style bumper 'L' Rocker switch: (blue), sequential bumper lights
63993 - plug and play turn signal kit for Ranger 1000 XP (with HD style bumper) 'L' Rocker switch: (blue), horn hazard, sequential bumper lights
63994 - plug and play turn signal kit for Ranger XP 1000 with HD bumper: Lever switch: (black), hazard, sequential bumper lights
63995 - plug and play turn signal kit for 25 Ranger 1000 XP with HD bumper Lever switch (black), horn hazard, sequential bumper lights
63996 - Installation
63997 - plug and play turn signal kit for 24-25 RZR XP: Rocker switch (amber), replacement fangs with turn signals
63998 - plug and play turn signal kit for 24-25 RZR XP: Rocker switch (amber), horn / hazard, replacement fangs with turn signals
63999 - plug and play turn signal kit for 24-25 RZR XP: Rocker switch (green), replacement fangs with turn signals
64000 - plug and play turn signal kit for 24-25 RZR XP: Rocker switch (green), horn / hazard, replacement fangs with turn signals
64001 - plug and play turn signal kit for 24-25 RZR XP: Rocker switch (blue), replacement fangs with turn signals
64002 - plug and play turn signal kit for 24-25 RZR XP: Rocker switch (blue), horn / hazard, replacement fangs with turn signals
64003 - Plug and Play turn kit with hazard (24-25 RZR XP) Black Lever Switch -Fang Lights with turn signals
64004 - plug and play turn signal kit for 24-25 RZR XP: Lever switch: (black), horn / hazard, replacement fangs with turn signals
64005 - Fang light set for 24-25 RZR XP with built in turn signals
64008 - plug and play turn signal kit for 24-25 RZR XP: Lever switch: (black), horn / hazard, replacement fangs and eyebrow
64009 - DRL Bumper Light Add-On Kit For 25 Polaris Ranger XP 1000 bumper - Connects to Tube Kits
64011 - Plug and Play turn kit with hazard (19+ RZR) Black Lever Switch -Smoked Fang Lights
64014 - Recessed Sequential Bumper Light Set for 2025 Ranger with HD Bumper
64016 - plug and play turn signal kit for Ranger XP 1000 with HD bumper: Lever switch: (black), hazard, recessed sequential bumper lights
64017 - plug and play turn signal kit for 25 Ranger 1000 XP with HD bumper Lever switch (black), horn hazard, recessed bumper lights
64018 - plug and play turn signal kit for Ranger 1000 XP with HD style bumper 'L' Rocker switch: (blue), recessed bumper lights
64019 - plug and play turn signal kit for Ranger 1000 XP (with HD style bumper) 'L' Rocker switch: (blue), horn hazard, recessed bumper lights
64030 - Front Harness With Crush Tube Lights - 300
64031 - Front Harness With Crush Tube Lights - 500
64055 - Rear Harness Signal Kit with 19+ Rear T Harness
64056 - Rear Harness Signal Kit with 570 Rear T Harness
64057 - Rear Harness Signal Kit with 15-18 Rear T Harness
64058 - Rear Harness Signal Kit with General Rear T Harness
64059 - Rear Harness Signal Kit with 24+ Rear T Harness
64060 - plug and play turn signal kit for 2025 RZR PRO, Rocker switch (amber), replacement fang lights
64061 - plug and play turn signal kit for 2025 RZR PRO: Rocker switch (amber), horn / hazard, replacement fang lights (clear lens)
64062 - plug and play turn signal kit for 2025 RZR PRO: Rocker switch (green), replacement fang lights (clear lens)
64063 - plug and play turn signal kit for 2025 RZR PRO: Rocker switch (green), horn / hazard, replacement fangs (clear lens)
64064 - plug and play turn signal kit for 2025 RZR: Rocker switch (blue), replacement fang lights (clear lens)
64065 - plug and play turn signal kit for 2025 RZR PRO: Rocker switch (blue), horn / hazard, replacement fang lights (clear lens)
64066 - plug and play turn signal kit for 2020+ 1000 non XP: Lever switch: (black), hazard, grille insert lights
64067 - plug and play turn signal kit for 2020+ 1000 non XP: (black), horn / hazard, grille insert lights
64070 - plug and play turn signal kit for 2020+ Ranger 1000 NON-XP: 'L' Rocker switch: (blue), horn / hazard, grille insert lights
64073 - plug and play turn signal kit for 2022 Ranger 570 SP: Lever switch: (black), hazard, grille insert lights
64074 - plug and play turn signal kit for 2022 Ranger 570 SP: (black), horn / hazard, grille insert lights
64075 - plug and play turn signal kit for 13+ Ranger 500/570/900: Lever switch: (black), horn / hazard, custom front lights
64076 - Fang Light Set with Clear Lens for 2025 RZR Pro R, Pro XP
64077 - L Series Bumper Light Rocker Switch
64078 - L Series Bumper Light Rocker Switch add-in for Plug and Play Turn Signal Kits with Bumper Lights (2025+ Ranger 1000 XP)
64091 - Power Bar Battery Tap with Relay Compatible with Polaris Pulse bar
64092 - Bumper light set for 2025 Ranger with wiring harness - Running lights only
64093 - Fascia Light set for Ranger 900
64102 - DRL to Headlight conversion kit for V2 Plug and Play Turn Signal Kits.
64105 - plug and play turn signal kit for XPEDITION: Lever switch: (black), horn / hazard, front harness only
64106 - plug and play turn signal kit for XPEDITION: Lever switch: (black), hazard, front harness only
64107 - plug and play turn signal kit for XPEDITION: Rocker switch (blue), horn / hazard, front harness only
64108 - plug and play turn signal kit for XPEDITION: Rocker switch (blue), tube lights (white lens)
64109 - plug and play turn signal kit for XPEDITION: Rocker switch (green), horn / hazard, tube lights
64110 - plug and play turn signal kit for XPEDITION: Rocker switch (green), tube lights (white lens)
64111 - plug and play turn signal kit for XPEDITION: Rocker switch (amber), horn / hazard, front harness only
64112 - plug and play turn signal kit for XPEDITION: Rocker switch (amber), front harness only
64113 - Turn Assembly: 920 VERSION 2
64117 - XPEDITION front headlights set with turn signals
64118 - plug and play turn signal kit for XPEDITION: Rocker switch (amber), headlights
64119 - plug and play turn signal kit for XPEDITION: Rocker switch (amber), horn / hazard, headlights
64120 - plug and play turn signal kit for XPEDITION: Rocker switch (green), headlights
64121 - plug and play turn signal kit for XPEDITION: Rocker switch (green), horn / hazard, headlights
64122 - plug and play turn signal kit for XPEDITION: Rocker switch (blue), headlights
64123 - plug and play turn signal kit for XPEDITION: Rocker switch (blue), horn / hazard, headlights
64124 - plug and play turn signal kit for XPEDITION: Lever switch: (black), hazard, headlights
64125 - plug and play turn signal kit for XPEDITION: Lever switch: (black), horn / hazard, headlights
64126 - Turn Indicator Brake Aware-Alert Add-On for Plug and Play Turn Signal Kits - Lever Switch
64127 - plug and play turn signal kit for XPEDITION: Rocker switch (amber), headlights, LED tubes
64128 - plug and play turn signal kit for XPEDITION: Rocker switch (amber), horn / hazard, headlights, LED tubes
64129 - plug and play turn signal kit for XPEDITION: Rocker switch (green), headlights, LED tubes
64130 - plug and play turn signal kit for XPEDITION: Rocker switch (green), horn / hazard, headlights, LED tubes
64131 - plug and play turn signal kit for XPEDITION: Rocker switch (blue), headlights, LED tubes
64132 - plug and play turn signal kit for XPEDITION: Rocker switch (blue), horn / hazard, headlights, LED tubes
64133 - plug and play turn signal kit for XPEDITION: Lever switch: (black), hazard, headlights, LED tubes
64134 - plug and play turn signal kit for XPEDITION: Lever switch: (black), horn / hazard, headlights, LED tubes
64148 - plug and play turn signal kit for 2022+ Ranger 570 SP: 'L' Rocker switch: (blue), replacement headlights with turn signals
64149 - plug and play turn signal kit for 2022+ Ranger 570 SP: 'L' Rocker switch: (blue), horn / hazard, replacement headlights
64150 - plug and play turn signal kit for 2022+ Ranger 570 SP: Lever switch: (black), hazard, replacement headlights
64151 - plug and play turn signal kit for 2022+ Ranger 570 SP: Lever switch: (black), horn / hazard, replacement headlights
64158 - plug and play turn signal kit for Ranger 'L' Rocker switch: (blue), stick-on lights (clear lens) and 3/4 lights (clear lens)
64163 - UPGRADE KIT - Lever Switch Turn signals from 900 to 920 with horn (Version 3 Kit ONLY)
64168 - plug and play turn signal kit for 2026 RZR XP S Rocker switch (amber), crush tubes
64169 - plug and play turn signal kit with Horn / Hazard for 2026 RZR XP S Rocker switch (amber), crush tubes
64170 - plug and play turn signal kit for 2026 RZR XP S Rocker switch (green), crush tubes
64171 - plug and play turn signal kit with Horn / Hazard for 2026 RZR XP S Rocker switch (green), crush tubes
64172 - plug and play turn signal kit for 2026 RZR XP S Rocker switch (blue), crush tubes
64173 - plug and play turn signal kit with Horn / Hazard for 2026 RZR XP S Rocker switch (blue), crush tubes
64174 - plug and play turn signal kit with Horn / Hazard for 2026 RZR XP S Lever switch, crush tubes
64176 - Turn Indicator Brake Aware-Alert Add-On for Plug and Play Turn Signal Kits - Rocker Switch
64178 - Trailer Plug Addin V3 (custom built T harness) - to be purchased with plug and play kit

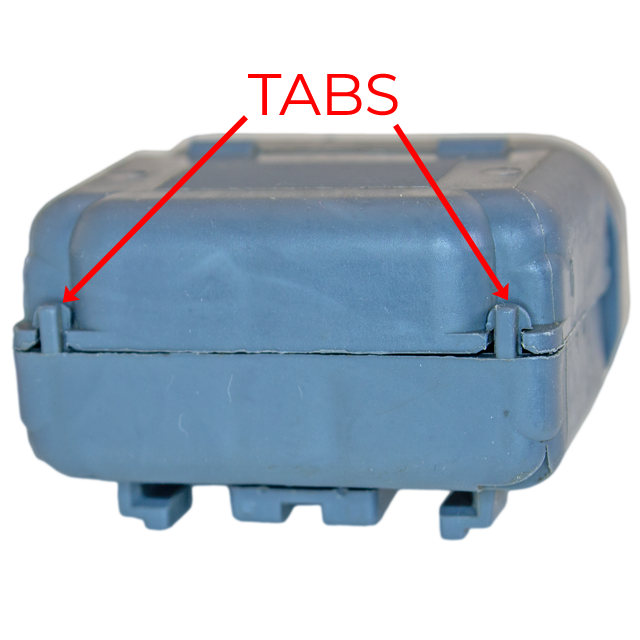
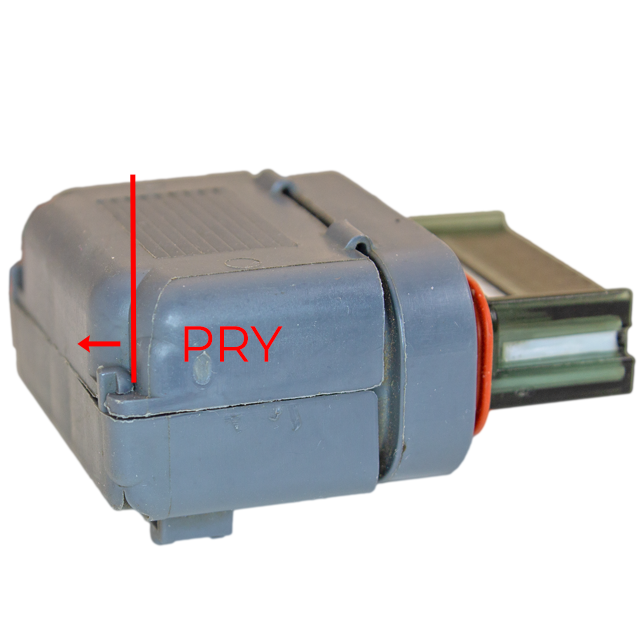
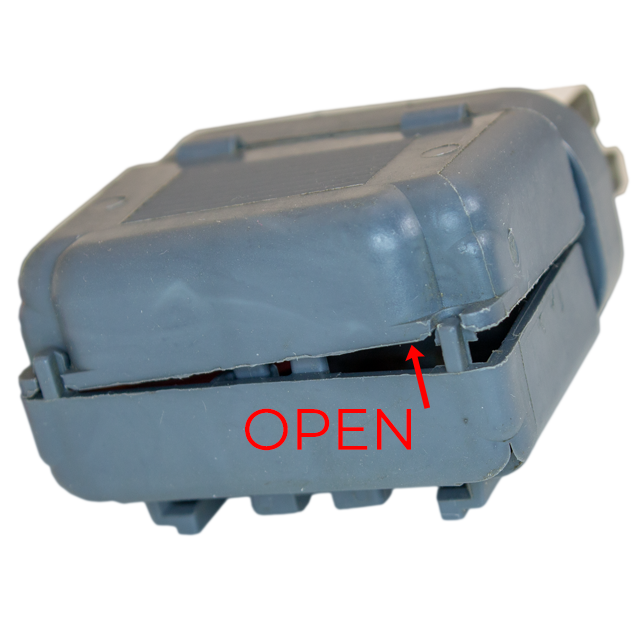
 Pry the tabs away from the nose of the connector and open the wire shield to access pins 6 and 7.
 Use the removal tool to depress the white tabs on the ends of the connector.

 Make sure that the inserted pins are the same length as the rest of the pins.